Getting the transcript
Reading the captions from YouTube. A video nobody has opened here before takes 10 to 30 seconds; this page fills in on its own.
Getting the transcript
Reading the captions from YouTube. A video nobody has opened here before takes 10 to 30 seconds; this page fills in on its own.
Grant Abbitt (Gabbitt) · @grabbitt
Where viewers went back to watch this video again, from YouTube's public Most replayed graph, lined up with what was said at that moment.
Most replayed moment #1
16:564.1x the video's typical replay level
So, let's go across to the UV editing workspace, and you'll notice this already got an unwrap, but because I've resized the object, it doesn't make any sense anymore. So, I'll need to go to edge mode and alt left click on these
Said at 16:53
Most replayed moment #2
1:043.4x the video's typical replay level
here, another one up to the top. And it's important to say that this is more an intermediate tutorial. If you want to learn this process as a beginner, then do check out my environment course that goes through the whole process in a much more methodical, beginner-friendly way. And it's currently on sale. Nice simple
Said at 0:57
Most replayed moment #3
22:502.2x the video's typical replay level
Then we come across to our render settings. We can go to material preview mode for this. And you can see our normal map working there. And it's not actually too bad even with sRGB. But if I come in and change this to non-color data, you can see that's much more detailed and much nicer. And you can actually see the
Said at 22:43
The graph counts replays. It does not show where viewers stopped watching.
Words
5,631
Runtime
26:51
Speaking pace
210wpm
Reading time
23min
210 words per minute, above the 201 75th percentile of 349 measured videos. That distribution comes from the 349-video hook study.
Opening (first 30 seconds)
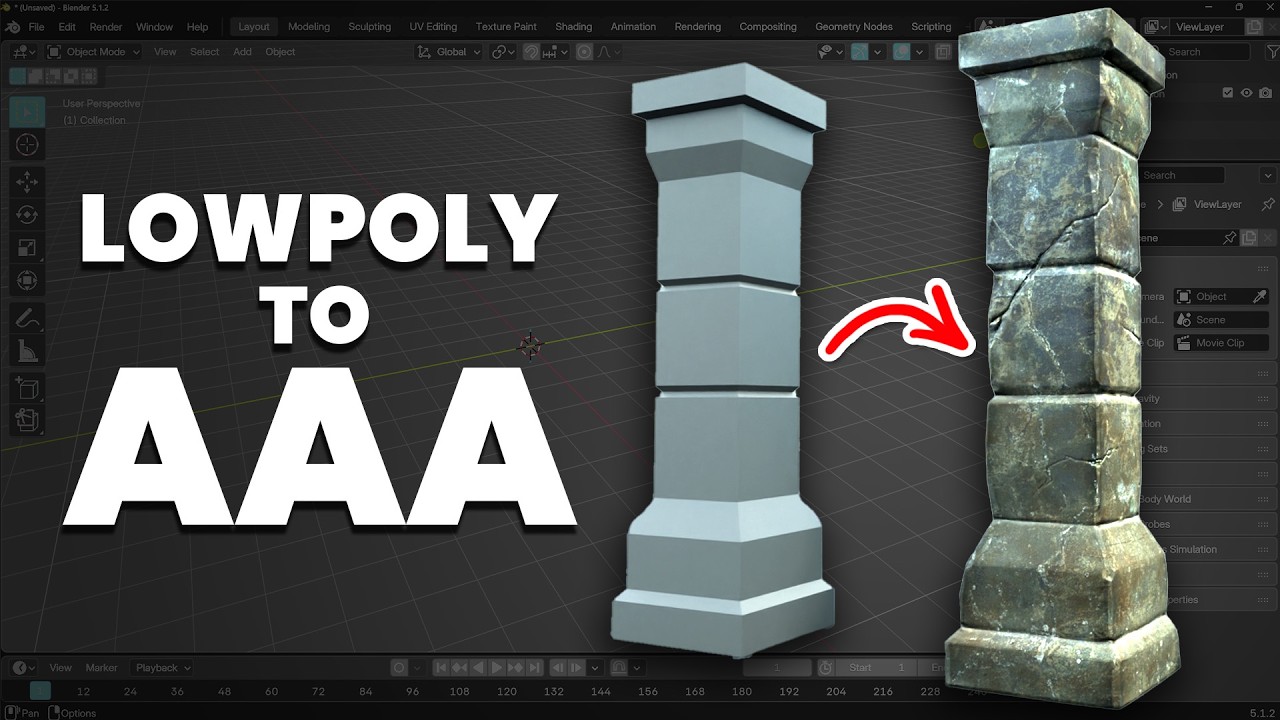
Both of these assets are low-poly, but one looks very low-poly and flat shaded, the other one looks like a AAA game asset with lots of detail. So, I'm going to show you how you can go from the low-poly style and turn it into a AAA asset while still keeping the poly count really low. Quick shout-out to PC Specialist and NVIDIA for sponsoring this video. If you want to rig optimize perfectly for Blender, use PC Specialist's online configurator to customize your next RTX system. Now, let's make some awesome AAA game assets. So, I'm in a new startup file. I'm in Blender
105 words, the words spoken in the first 30 seconds at 210 words per minute.
Free, no signup. See how the first 30 seconds hold attention, with rewrites.
Sentence shape
| Measure | This transcript |
|---|---|
| Sentences | 359 |
| Average words per sentence | 15.7 |
| Longest sentence | 90 words |
| Questions asked | 2 |
| Sentences containing a number | 15 |
Most used terms
Filler phrases
69 in total: like 42 · actually 11 · kind of 5 · sort of 5 · basically 4 · I mean 1 · you know 1.
A literal whole-word count of the same phrase list the Prepublish browser extension uses, so a phrase inside another word is not counted and a phrase used in its ordinary sense still is. It is a count and not a judgement.
What this transcript is
Every word below is the caption track YouTube publishes for this video, pulled from the video itself and reproduced unchanged. It is not Prepublish's writing, not a summary, and not a re-transcription: it is the video's own published captions. English captions, generated automatically by YouTube, in the video’s original language. Source: the video on YouTube. A channel that would rather this page did not exist can ask for its removal through the contact page, and it is removed.
Both of these assets are low-poly, but one looks very low-poly and flat shaded, the other one looks like a AAA game asset with lots of detail. So, I'm going to show you how you can go from the low-poly style and turn it into a AAA asset while still keeping the poly count really low. Quick shout-out to PC Specialist and NVIDIA for sponsoring this video. If you want to rig optimize perfectly for Blender, use PC Specialist's online configurator to customize your next RTX system.
Now, let's make some awesome AAA game assets. So, I'm in a new startup file. I'm in Blender 5.1.2, and I'm going to create a low-poly pillar. I'll go through this very quickly because I've got lots of tutorials about how to create low-poly objects on this channel, and I'll post some of those in the description. I'll press N on my keyboard, bring up the side panel, and I'll change the Z to 6, and my size will be 1.5. I think that's a good pillar size.
And let's just go in and do a bit of editing to make this look like a pillar. So, into edit mode, let's do a loop cut, bring that down here, another one up to the top. And it's important to say that this is more an intermediate tutorial. If you want to learn this process as a beginner, then do check out my environment course that goes through the whole process in a much more methodical, beginner-friendly way. And it's currently on sale.
Nice simple pillar there. I'll create a couple of loop cuts here, Ctrl B to bevel, and hold down Shift for smaller increments, and use the wheel of my mouse to create an extra loop in there, and I can just select these two edge loops, scale Shift Z, and then we've got what looks to be a stone pillar there. So, that's all great. Might add just one more bit of detail at top. I think that works relatively well. I'll just create a little bit of a slope.
I always think that looks better than right angles. And actually, I've got an extra set of loops at the top here I can dissolve. We don't need those, and there's my pillar. So, nice and simple, and from here, we want to turn it into a AAA game asset that looks nice and real. So, to add the realism, we need to sculpt on the information, but our shape currently only has a small amount of polygons. So, if we try and sculpt these, we'll be pushing and pulling around just these small amount of vertices.
So, we need to add polygons and we use the multi-resolution modifier for this. Before I jump to that though, I want to even out my faces slightly. What I mean by that is I'm going to add a few faces so we haven't got very small, in this case very thin, faces compared to very large faces like this. So, I will be adding a few polygons at this point. So, control R, do loop cut and I'll do three across here, three across here and control R.
I'm using the wheel of my mouse to create more loops. I'll do two across the middle there and two there and maybe one in the middle here as well. So, you can see I've evened them out a bit. We have got a little bit of size discrepancy between these ones and these ones, but it's much better than it was with a huge big polygon here and then a very thin one here. The reason I'm doing that is because the multi-resolution modifier subdivides the faces and therefore it's taking each of these faces and cutting it into four.
So, the more levels I go up, so the more detail I can sculpt, the more detail you'll get in these smaller areas than you would in the bigger areas. So, that's why I've evened it up like this and this amount of polygons we can reduce later on with a decimate modifier. And in reality, it's actually very helpful to have a little bit more topology on your shape for other stages later on as well. So, let's go across to the modifier and in fact, before I add it, it's very important that you apply your scale.
So, I'll go to object mode with tab. You can see my scale is non-uniform and the sculpting will be all strange if I try and sculpt with it like this. So, to apply the scale we press control A to bring up the apply there scale there or you can go to object, apply and scale. So, you can see these are all set to one now. I'll press N on my keyboard to get rid of the side panel and let's add the multi-resolution modifier.
So, under the modifiers, add modifier, I'll type in multi and there's the multi-resolution. Now, if I go to edit mode, you can see this is all grayed out so you must be in object mode to do this. And if I just press subdivide, you can see it's making it a bit blobby, much like the subdivision surface modifier. It divides each face into four, but it also smooths it out. We don't want that, so I'm going to undo that. We can use the linear option instead.
So, I tick that. I have added a level here, but you can't see any difference, and that's exactly what we want. What I will do though is I'll turn on the statistics, so you can see the faces I'm adding over here, and let's add a few more levels. So, each time this number should times by four because it's taking each face and dividing it by four. So, you can see we're up to 24, we'll go up to 100 here, 400,000, and so on.
And we should be able to go up fairly high because I've got a very fast computer, but this is where you want to be a little bit more careful if you've got a slower machine, which is a great chance to talk about my lovely new laptop given to me by PC Specialist and Nvidia. I'm a really big fan of PC Specialist systems and have purchased them well before being sponsored. I can personally vouch for their reliability. My 2021 desktop is still running flawlessly.
Renowned as a leading custom PC manufacturer in Europe, PC Specialist builds high-performance gaming PCs, laptops, and workstations tailored for creators and pros. Every system features meticulous cable management, as you can see here. Just look at that beautiful piece of art. And each system undergoes rigorous stability testing. You can easily design your own custom RTX 50 series system using their online configurator.
Head to the link below to build yours, and use the code in the description for a £40 discount on eligible orders. Whatever system you choose, I would always recommend an Nvidia RTX GPU to accelerate creative applications like Blender using the power of the GPU and the AI. Nvidia are really leading the way when it comes to improving performance in Blender. The ray tracing and AI cores makes it even faster when you have an RTX GPU and enable Nvidia OptiX, which is an absolutely tremendous performance boost as a Blender user.
I wouldn't choose any other GPU except for an Nvidia RTX. So, let's get back to our asset. I'm up to about 6 million faces. We can go a bit higher than that. And because this machine is very fast and powerful, I can go to 25 million faces quite comfortably. But I have found this works very nicely with 6 million faces, and you can get some great results even lower than that, in fact. So, don't panic if you've got a slow computer, but if you have got a faster machine, it's nice to be able to have that extra detail.
Okay, so now we're ready to do our sculpting. So, I'll go across to the sculpting workspace now. Okay, so I'm in sculpt mode and I've got my brushes along the bottom here. I'll just click and drag and bring another level of brushes out. These are a couple of the brushes I really like to use for sculpting, particularly rock type structures, are the scrape fill and the trim brush. I've also got some specialist brushes, should we call them, that I made specifically for sculpting rock, and I'll talk about those in a moment.
Now, to speed things up, I'm going to turn on the X, Y, and Z mirror, so I'll just be working basically in the bottom corner here. In fact, it's not mirrored in the Z, so I'll turn off the Z, sorry. And let's go to that scrape fill brush just here. And the way I use this is to just scrape across the edges like so. And this, as it says, it scrapes them as if they have been worn away over time. Now, you might find it pinches a little bit in these corners here.
That's fine. I'll sort that out as we go. I'm just going through scraping some of these free corner pieces off. And I'll do it a tiny bit across the bottom, maybe a little bit extra on the very corner just there. So, everywhere we've got an edge, I'll be scraping those. And it doesn't matter if I'm a bit wobbly with my brush. That adds to the natural wear. Incidentally, I'm using a pen rather than a mouse. That gives me the option of using the strength pressure, so I can push harder or softer to change the strength.
Makes it a little bit easier. Okay, so that was nice and simple, but you can already see that it's got a little bit of character to it now. And I might go around doing a little bit more as we go. But I'm going to take you to the next brush, which is this crease sharp. There's also the crease polish. I'm going to use the crease sharp because it is a very powerful pen for digging in to areas like so. A bit too wobbly that one, so I'll try that again.
So, I'm creating just a little bit of a dent in there as if there's a stone on top of another. You might have to go around the corners a little bit more aggressively so that digs in properly and just go across those lightly there and at the top as well. Just scrape this top off as well just here. And just a little bit of extra down here. Excellent. So, already this is starting to look a bit more like a worn pillar. Let's have a look at the trim brush next then.
So, if I use this, I'll turn off the mirror now because this can create some quite detailed obvious dents. So, if I come in here, you can see it's like a more powerful scrape brush. So, I can create much more extravagant damage like so. So, let's have a fair bit of damage in here and again we're starting to see the detail coming through now. And this digs in really nicely but keeps it kind of lumpy as you might expect a damaged pillar to look.
The interesting thing about this brush is if you do it on flat surfaces, it doesn't do anything cuz it's scraping away corners, it's trimming them off basically. Sometimes it's a little bit tricky when it comes to areas like this where you've got your crease brush that's gone in but you can just grab your crease brush again and go in a bit further into these areas. And you can see that detail being added there. So, I'll just go around and do a little bit more of those.
Watch out for protruding bits like this. Try and cut those back. And if it's a bit too bumpy, you can always go to the scrape and fill and kind of pat it down basically or scrape it down, I guess. And that can work really nicely. I've sped this footage up about seven times just so we can speed up the tutorial but you hopefully can get the idea of what I'm doing here. >> I'm accentuating these crevices with this crease brush.
And already we've got quite a nice looking pillar just there. Now we can take this further as I was talking about earlier with these rock brushes. I'll click on one of those brushes and this is just called rock one. If you want to know how to make these brushes then check out the tutorial linked in the description. You can create new brushes by right clicking and duplicating an asset and usually you use the default draw brush as your base brush and then you convert it.
So this rock one brush, the two things I've changed is the texture. If I open up the texture and go across these brushes you can see they've got different black and white textures and I've downloaded these from free pbr.com and just use the height map for different rock materials and you can see those all across there. And the other thing I changed, if I just go back to the first one, is the stroke method. Rather than space, which is the default, I change it to anchor.
And what that does, if I click and drag, you can see that you can drag out a sort of rocky texture. But I'll undo that though because obviously that's far too powerful for one. Shift F is to change the strength of your brush and I'll bring that down to maybe point one and see what that looks like. It's quite nice but probably not the right type of brush. It's a little bit too uniform. So I'll undo that try the next one.
That's quite nice for details. So again, I'll just change the strength of this one to point two and see what that looks like. That looks good and I'll just create a bit of weathering over my pillar like so. And I'm changing the size so it's not too uniform across the mesh and you can hold down control to dig in with the brush to create some dents. Might be a little bit too strong so I'll just bring it down a touch. And it's fine if they overlap, especially when you have it a low strength like this.
And I'm just filling it in with a bit of noise, basically. Let's just zoom out and see what we got. So, you can see a little bit of noise across the pillar now. Might be a little bit too much. You can flatten it out with the scrape peak. That can work quite well with some noise in there. So, if I just scrape over this, you can see it sort of flattens it out giving it more variation. Got a little bit of a dent in that one.
That should be okay, but I'll use that a bit later on. So, that's working relatively well. And again, lots of different brushes that I can use. So, I can jump across these different brushes and maybe use one like this. But again, quite low strength for this, particularly this type of detail anyway. And hardly any change there really, but just a subtle variation across the mesh can look quite interesting, especially in areas where it's a little bit blank.
Something like this could work. I'll just go across these. Here's a very noisy one. And if I now change the strength to something like 0.5, so quite high, I can come into these areas, hold down control, and really scuff them up as it were with lots of noise like that. And then it looks very worn. And I think that works quite well. Might bring that down a little bit more and just have some areas of wear like this. And I'm very gently using my brush with that anchor technique there.
And it's just a area of wear like so, maybe in some of these crevices and on the corners. The mice have obviously been at this pillar eating away. And I'm going into the crevices because where dirt collects, maybe some plants are going to grow out of these crevices. I'm holding down control as well to vary it. So, you can dig in and pull it out as well. And that looks quite effective. Of course, you can create some bigger piece of wear if you feel you need to.
I could perhaps use that and then the scrape brush to kind of scrape that down. And it looks a little bit like the stone is kind of flaking a bit there. So, I quite like that as well. I might try just another couple of different styles. This is a very detailed one there. I think that's working relatively well. I could add some more detail, but I'll keep it simple for now. I just want to show you the next technique, which is using, once again, the crease sharp brush.
But this time I'm going to go in and create some cracks. So, I'll bring my brush nice and small. I'll just go across the mesh like so, creating a crack like this, and then dig in to certain areas a little bit more than others. So, maybe into here, sort of accentuating that crack as it goes through this part here. Now, it gets a bit blobby sometimes with this particular brush, so I'll need to smooth that out and then go in a little bit again.
And sometimes holding down control to sharpen up the edge, like so, can work as well, just to refine that crack a little bit, like so. So, we've got a simple crack going across the mesh like that. And I'll just do a little bit of variation. Again, it's a little bit easier with a pen, this. Let's flatten out the areas around it slightly. Maybe use a noise brush, if I can find one, in some of these areas. Let's up the strength a little bit there.
And you can get some cracks like so. I'll do another few of those, just so you can see the techniques. I've probably got my brush a little bit big there because I was far away. And notice how it is a little bit unusual across these edges as it goes into the corners. That is one limitation of the multi-resolution modifier. It does tend to go a little bit strange when you go across an edge like this. These cracks can actually take a little bit of practice.
Oh, clicked on the Cartesian coordinates there. But once you get the hang of them, it's really good fun. Probably easier to start with a smaller brush and then build up. And let's get the noise brush now. Care up some of this globbiness with this noise brush. And that looks quite fun. Crack going across the pillar there. And hopefully you can see from there the different techniques that you can use to create some interesting looking pillars.
Just noticed some upside down there. We've got a nice lot of variation across this one. I'd probably take this a bit further, but for tutorial sake, I think this is probably enough. Okay, so how do we take this information with all this detail and make sure that it's a nice low poly object? Well, we do this through a process called baking, and it takes all this detail and puts it into a normal map onto our low poly object.
And the great thing about the multi-resolution modifier is that it has it kind of built in. So, the first thing we need to do is unwrap our object. So, let's go across to the UV editing workspace, and you'll notice this already got an unwrap, but because I've resized the object, it doesn't make any sense anymore. So, I'll need to go to edge mode and alt left click on these top edges around here, and I'm unwrapping it as if it's a cylinder.
So, separating the top, one down the side here, and separating out the bottom just there. Once I've got those selected, I can go to the edge menu and mark seams. You can also right click and mark seams just there. Now with my seams marked, I can press A to select all, U to unwrap, unwrap angle based. Now it comes up with a slightly awkward UV map, but it is nicely laid out. We've only got three islands, and there are tools you can get to straighten these out, but there's no real need for the sake of this tutorial.
I'll just quickly reposition some of the islands, so A to deselect all, L to select linked, and just G to grab and move that up. And this one here, I'll move that. Just so there's a nice little space around it. And this one I might as well move into the middle. Make sure there's no issues around the edges. Okay, so this is ready for baking now, and the texture will now know where to go on the object. So for the baking process, I'm just going to bring down a new window in the UV editing workspace.
So at the top here, click and drag, bring that down, and I'll change this to the shader editor. This is nicely laid out to explain what's going on. I'll press N on my keyboard to get rid of the side panel, and we've got the current material for this pillar. I'll just rename it so it's nice and clear. So this is the pillar. So the first thing we need is a texture to bake onto. So shift A to add, texture, and then image texture.
I'll bring that to the front, and let's just zoom in on that, and I'll create a new texture. I'll call it pillar norms, for normals. Click and drag over both of these, and change it to 2048 by 2048. So it's a higher resolution texture, a 2K texture. You can go higher than this if you want more detail, but 2K tends to be fairly normal these days. We don't need an alpha channel, that just makes our file bigger, and it's for transparencies.
And some people attempted to use the 32-bit float. That's good if you're doing films and animation, but it's not good for games. So I'll leave that unticked, and press new image. Now the color space automatically is sRGB. For normal maps, it should be non-color data. I'm going to actually leave it like that. Normally I'd change it to non-color data here, but I want to show you in case you make the error of forgetting.
So you can see our new texture down here is just completely black, and you should always see the texture that's selected in the UV editor. Now, before I bake, there is one thing that I want to do. I'll go across to the modifiers and I'm just going to turn the levels in the viewport down to zero. So, now when I go back to object mode with tab, you can see the base level here, our low-poly version. Now, if I turn this up just one, you can see the shape slightly changes.
It's got lots more undulations and in fact, this is still very low-poly. I'll quickly turn on the statistics so you can see. It's currently 1 and 1/2 thousand faces, which for a pillar is very low-poly. So, we could even use this as our base mesh. But if I go back to zero, you can see it's very flat and the original shape that we made. However, if I go to the shape option under the multi-resolution modifier, there is an option here conform base.
I don't tend to use apply base. I'll show you what that looks like if I apply base. It goes very distorted. So, I'll undo that. However, under the shape and conform base, that actually conforms it to the higher poly and takes into account some of the editing that we've done. And in this case, it looks quite a nice silhouette as they say. And that's what you're really looking for is the silhouette. Does it match the high poly?
If I take this up to a few higher levels, you can see it's matching the shape quite nicely. So, this is great at level zero. If you've done lots of distortion to your shape, you might want to go up one level and take the hit when it comes to the face count. And there's ways of reducing that with a decimate modifier later on anyway. But I'm happy keeping my levels to zero. Okay, so we're ready to bake now that we've reshaped our object.
We go across to the render settings. You can only do this in cycles, so I'll change to cycles and because I've got a fantastic GPU, I'll use my GPU. And then to bake, we scroll down to the bake options just here. I'll open that up and there's two different ways of baking. There's baking from a multi-resolution modifier, which is what we're going to do, and there's baking from one object to another, hence why you've got all these extra menus here.
However, when I tick the bake from multi-res, I'll just bring that out so you can read it. The bake from multi-res here, it takes away all the complicated menus and leaves you with this bake type here, which is normals, displacement. Vector displacement is for creating brushes and things like that. So, we'll just use the normals and displacement. We'll start with the normals as that's where the most detail is going to come through.
So, when you select normals, all you need to do now is just make sure that you have your texture that you've created selected. And ideally, remember to change it to the color space of non-color data. But like I say, I'm going to show you what it's like when it's sRGB. Just a quick note here, I actually forgot to right-click on my object and smooth shade. For some reason, flat shading still seemed to work with this object.
But generally speaking, you want to go for smooth shading to make sure you get good normals that react to light in the best possible way. So, right-click, shade smooth before you go through the next step. So, I'll press bake. You'll see the bake multi-res at the bottom here. And because I've got a particularly fast machine, this will be fairly quick. And baking from a multi-res is much quicker than baking from one object to another.
And you can see the normal map down at the bottom here. I'll press control spacebar and zoom in on that. And you can see all that lovely detail coming across there really nicely. So, control spacebar once again. Now, notice I can't change the color space here. That's because I haven't saved my texture. So, that's why I wanted to keep that in there to show you you need to save your texture before you can change it back.
So, save as. Got lots of tests in here. But I'll change it to pillar norms six, I think. And now I can change it from sRGB to non-color data. But before I do that, I just want to show you what it looks like if you plug it in as is. So, shift A to add, displacement normal map. And I'll just plug that straight in and move that over the noodle and it will connect up. Then we come across to our render settings. We can go to material preview mode for this.
And you can see our normal map working there. And it's not actually too bad even with sRGB. But if I come in and change this to non-color data, you can see that's much more detailed and much nicer. And you can actually see the change it makes to the normal map down here. And we've got that information in there and it's looking fantastic. Now, if you want to bake the displacement as well, as I was saying, across to the bake settings here, there is a displacement option here.
You will need to create a new texture for this, so I'll just duplicate this one, shift D, close it down, and create a new one, and call this pillar diss. For displace, and all the settings are the same, new image, make sure you click on it and it appears down the bottom here, so you know you're baking onto that one, and we've got a blank black texture once again. Again, this needs to be non-color data because it's black and white, and we can bake the displacement map.
Again, nice and quick because of my lovely new machine, thanks PC Specialist. And there you can see the displacement map. Now, there is another map that's even better than this, but unfortunately, you can't bake it out from the multi-resolution modifier, and that's the cavity map. And I'll do a separate video on how you can create those because it is a different process. But, we can use the displacement map to some good effect.
We don't want to actually use it as a displacement, there's no real need because we have the displacement data as a sculpt anyway, and displacements work on polygon count. However, we can actually just plug this into the base color for some nice effects, and you can see it just offers a little bit of extra shading to boost the shading in the crevices, and it highlights the extremities with white, and you can boost this even further with a color ramp, so shift A to add, color, color ramp. that in here, and I can give it a bit of a boost, and bring this up a little bit more, and we got quite a nice sort of cavity look to it.
If I mute that, you'll see what that looks like, so mute, and there's a little bit more shading. It's a bit of a hack, that one, to be honest, but it can be useful. And because we've got all this lovely detail, we can either just add a texture in, or we can do some texture painting on top of this, and it's really effective. For now, I'll just add a texture in, so I'll bring this across slightly, shift A to add, texture.
Image texture, bring that up here. And I'll open up a random rock texture. I used this one earlier, and it was quite effective. This is from free pbr.com, and if I go into the PBR material all you need is the albedo texture and I found this one to be quite nice. It looks like stone. It's called dungeon stone one and I'll open that up. This is sRGB so that's correct and if I just plug this straight into the color you can see that looks really quite effective there.
You can combine these two to offer some extra shading combined with your color by mixing them together. I've got the node wrangler add-on enabled you go to edit preferences and add-ons type in node and you can see the node wrangler there. Make sure that's ticked and close this down. Now if I hold down control shift and right click and drag I can mix two shaders together. And to mix this you'll bring the displacement into the bottom one and your texture into the top one.
Change the mix type to overlay. That will increase the lights and darks of your texture and if you bring the factor up to one you'll get the lights and darks of this on top of this texture and I think that looks quite effective. Bring that across slightly so you can see it's hooked up there. Lastly, just add a bit more realism you can actually use the displacement texture as a roughness map as well. I'll just move these up slightly.
I'll move this down and just plug it straight into the roughness for now and that will offer a little bit of variation in the roughness across the shape and of course once again we can use a color ramp to boost or decrease that so I'll just copy this one bring it in the middle here. Usually you flip them around because you want the darks to be the other way around. Again I go through this sort of thing more in my courses so I won't over explain that but I'll flip it around and I'll just change the blacks so it's not too shiny to a gray and that should offer some really interesting reflection and variation just there and that's how we create this great looking pillar just here and that's how we can go from this nice low poly version here into this detailed version here just through the textures so we still have the same poly count.
We've got all this nice detail with the cracks and crevices and that is how you go from low poly to triple A. Thanks for watching and I'll see you next time.
The words are the caption track's own and nothing is reworded or re-transcribed. Paragraph breaks are placed between sentences so the text reads as prose.
Free tools for your own script. No signup, no login.
Paste your draft and see where viewers are likely to drop off, with a rewrite for each weak line.
Paste the first 30 seconds of your own draft for a hook score and rewrites.
Check your draft against YouTube's advertiser-friendly guidelines before you record it.
Read this channel's public videos and transcripts, and download a writing brief for it.