Getting the transcript
Reading the captions from YouTube. A video nobody has opened here before takes 10 to 30 seconds; this page fills in on its own.
Getting the transcript
Reading the captions from YouTube. A video nobody has opened here before takes 10 to 30 seconds; this page fills in on its own.
ChuckCG · @chuckcg
Words
1,255
Runtime
29:01
Speaking pace
43wpm
Reading time
5min
43 words per minute, below the 160 25th percentile of 349 measured videos. That distribution comes from the 349-video hook study.
Opening (first 30 seconds)
Hi everyone. In this tutorial, I'm going to show you how to make rocks in Blender. All the process, sculpting, making the
22 words, the words spoken in the first 30 seconds at 43 words per minute.
Free, no signup. See how the first 30 seconds hold attention, with rewrites.
Sentence shape
| Measure | This transcript |
|---|---|
| Sentences | 171 |
| Average words per sentence | 7.3 |
| Longest sentence | 17 words |
| Questions asked | 1 |
| Sentences containing a number | 3 |
Most used terms
What this transcript is
Every word below is the caption track YouTube publishes for this video, pulled from the video itself and reproduced unchanged. It is not Prepublish's writing, not a summary, and not a re-transcription: it is the video's own published captions. English captions, generated automatically by YouTube, in the video’s original language. Source: the video on YouTube. A channel that would rather this page did not exist can ask for its removal through the contact page, and it is removed.
No Script X-ray for this video: YouTube shows a Most replayed graph only once a video has enough views.
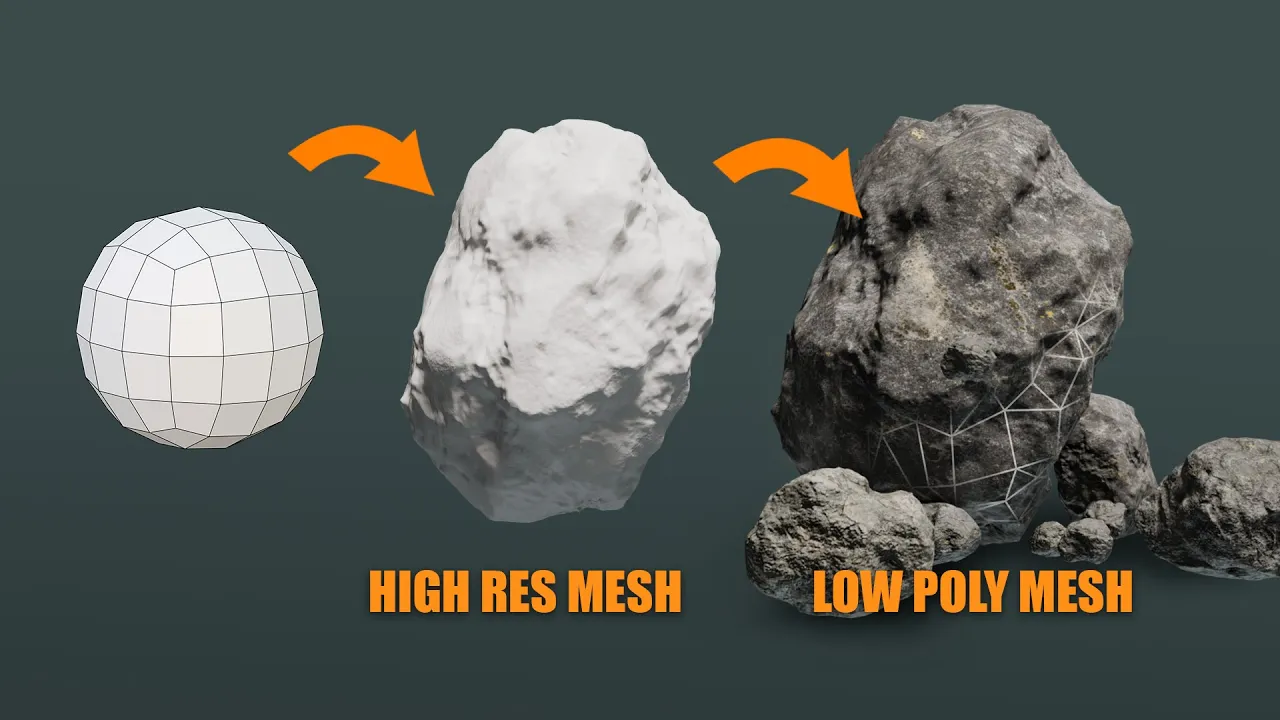
Hi everyone. In this tutorial, I'm going to show you how to make rocks in Blender. All the process, sculpting, making the normal map, and texturing will be in Blender. But, I made a separate tutorial for texturing the rock in Substance Painter. So, if you want to learn Substance Painter, the tutorial is available for patrons. Okay. I'm going to start with a cube. In modifiers, add the subdivision surface. Increase to three levels.
Now, right-click and convert to mesh. With control tab, go into sculpt. I'm going to select the brush, grab, and we can change the size in radius. We can also change the strength. The shortcut to change the size, press F. And now I'm just trying to give a different shape. Press control tab and go back to object mode. Right-click and shade the smooth. Let's go ahead and add the multi-resolution modifier. Click on subdivide.
We need several levels. Just be careful with face count. Here you can find it. If you can see it, right-click and select scene statistics. Again, go back to sculpt. And now we can use clay strips. We can add a texture. Click on new. Now, go here in textures. Make sure you set to brush. And now we can use clouds texture. Let's get it up just a little bit. Now, go here in brush. And check the box from faces only. Now, we can start sculpting.
It's just a matter of giving an organic shape. You can use a drawing tablet if you want, but for something like this, it's not necessary. I'm using a mouse. I didn't need the tablet. By pressing shift, we can smooth. And as you can see here, this is why we need to enable from faces only. And now just keep sculpting until we cover all the mesh. Now, we can change to draw. And we can use the same texture. Now, here in stroke, change to to anchor.
Just click and drag. We can rotate the texture. We can also subtract. Once we're happy with the shape, let's select straight brush. Choose the size. And now we can flatten the mesh, but only in some parts. I can increase subdivision levels, so I can add more details. Now I have 1.5 million of polygons. You can go as high as your machine can handle. Now we can select draw and make the texture smaller. We need to lower the strength.
And just give more details here and there. Okay, now we are ready to bake the normal map here in Blender. Okay, so go back to object mode. In modifiers, make sure level viewport is at the highest level. Shift D to duplicate. Right click to keep the mesh in the same place. We can name it. I'm going to call it rock {underscore} low. And this one {underscore} high. And we can hide the high poly for now. And we need to re-topologize the {underscore} low.
We can apply the multi-res modifier. And we can use decimate modifier. I like to use it because it keeps the shape really well. Here in ratio, I'm going to set to point zero five. We need to wait for the process. Here we can see the face count. It's still too high, so we need a lower value. For my rock, I used point zero zero zero seven. And now as you can see, it's 2,000 faces. And now we can apply the modifier. Of course, it's not perfect.
We may need to clean the topology. Uh for example, here we can dissolve this vertex. Just enable this icon. Now press G, then G again. Move the mouse, so we can merge the vertices. Okay, now duplicate again. Right click to keep it in the same place. And name it rock {underscore} cage. Now select the low poly. Open the shader editor. Create a new material. Now with shift A, create an image texture. Connect into base color for now.
Click on new. You can name it. Choose the resolution. I'm going to use 2048. Then click on new image to create it. Uh something very important, before baking, make sure to select the texture. It has to be active, okay? Now go here in render properties and change to cycles render. We can only bake with cycles for now. Scroll down. And click on bake. In bake type, select normal. Also check the box selected to active. And enable cage.
With the eyedropper, select the cage. We can adjust the distance, but I'll leave it as it is. Now select the high poly rock. And we need to apply the multi-res modifier. And before we continue, we need to create the UVs for the low poly mesh. So we can go to UV editing. Now with edge selection, select an edge. Hold control, click, and this will follow the line. Once selected, press U and hit mark seam. Just repeat the process.
Hold control, and mark seam. Now in object mode, press control A and apply the scale. Go back to edit mode. Press A to select all the faces. Then press U and hit unwrap. Now we have the UVs. So now we can select the high poly mesh and apply the scale. Also for the cage, but first we need to scale it up just a little bit. So with the cage selected, make visible the low poly. In edit mode, let's change to wireframe. Just click here.
Now press alt S to scale it up along the normals. But remember only to scale the cage just a little bit. Make sure we cannot see the low poly mesh. Try to avoid any overlapping mesh. Let's go back to layout and make a new window here. Open the UV editor. Now delete the material for the cage and also for the high poly. We only need the material for the low poly mesh. Now make sure to select the texture to make it active.
This is important, otherwise baking won't work. Now with the low poly selected, hold shift, then select the high poly. Make sure to do it in this order. And finally click on bake. We have to wait the process to finish. And now we can see the normal map here. It's very important to save it, otherwise it can be lost. So click on image and save it. Now we can hide the cage and high poly. I'm going to create a new texture.
Select the normal map we just created. Connect into normal. Now shift A, vector, add normal map. In color space, switch to non-color. Now change to material preview. And as you can see, the normal map works. I'm just going to enable use light. Then create a sunlight. And lower the strength in viewport shading. Now increase the strength of the sunlight. Now let's add a color texture. We can duplicate the texture. Click on the folder and find the color texture.
I'm using textures from ambientcg.com. I'll leave the link in the description to that. Okay, so now duplicate the texture. Then connect to roughness. Select the roughness map. Change color space to non-color. We can lower specular. Now we can add a mapping node. Also add a texture coordinate. Connect from UV to vector, then to the textures. But only for color and roughness. Okay, so now here in scale, we can repeat the color texture.
I hope you find something useful. See you.
The words are the caption track's own and nothing is reworded or re-transcribed. Paragraph breaks are placed between sentences so the text reads as prose.
Free tools for your own script. No signup, no login.
Paste your draft and see where viewers are likely to drop off, with a rewrite for each weak line.
Paste the first 30 seconds of your own draft for a hook score and rewrites.
Check your draft against YouTube's advertiser-friendly guidelines before you record it.
Read this channel's public videos and transcripts, and download a writing brief for it.
Filler phrases
4 in total: like 2 · uh 2.
A literal whole-word count of the same phrase list the Prepublish browser extension uses, so a phrase inside another word is not counted and a phrase used in its ordinary sense still is. It is a count and not a judgement.