Getting the transcript
Reading the captions from YouTube. A video nobody has opened here before takes 10 to 30 seconds; this page fills in on its own.
Getting the transcript
Reading the captions from YouTube. A video nobody has opened here before takes 10 to 30 seconds; this page fills in on its own.
JK Brickworks · @JKBrickworks
Words
1,867
Runtime
10:08
Speaking pace
184wpm
Reading time
8min
184 words per minute, just over the 181 median of 349 measured videos. That distribution comes from the 349-video hook study.
Opening (first 30 seconds)
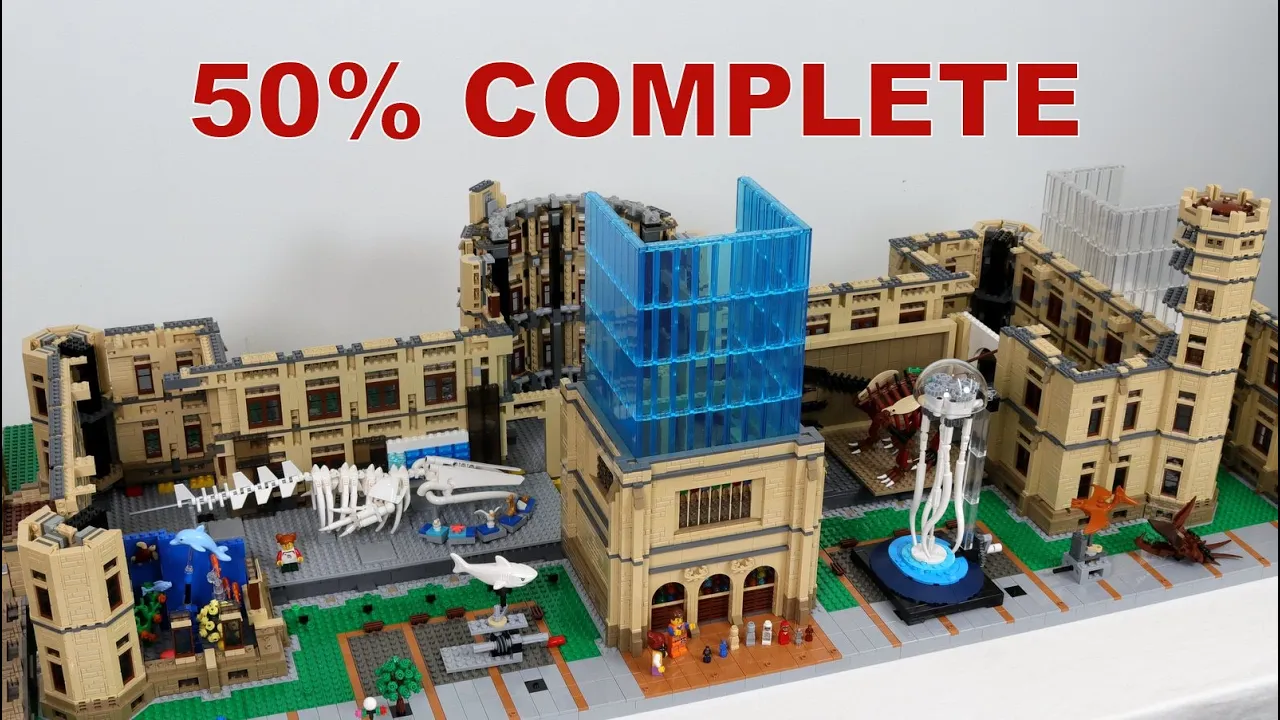
Hey, what is up everybody, Jason here. Today we are going to be taking a look at this scale LEGO model of the Canadian Museum of Nature which Kristal and I have been working on. This building is of course located in Ottawa, which is where we live, and this is part of a project our local LEGO Club has been working on to recreate certain iconic landmarks in the Ottawa region. Kristal and I decided to do the Museum of Nature because it is one of our favorite museums in the
92 words, the words spoken in the first 30 seconds at 184 words per minute.
Free, no signup. See how the first 30 seconds hold attention, with rewrites.
Sentence shape
| Measure | This transcript |
|---|---|
| Sentences | 63 |
| Average words per sentence | 29.6 |
| Longest sentence | 88 words |
| Questions asked | 0 |
| Sentences containing a number | 4 |
Most used terms
Filler phrases
23 in total: actually 11 · like 9 · kind of 2 · basically 1.
A literal whole-word count of the same phrase list the Prepublish browser extension uses, so a phrase inside another word is not counted and a phrase used in its ordinary sense still is. It is a count and not a judgement.
What this transcript is
Every word below is the caption track YouTube publishes for this video, pulled from the video itself and reproduced unchanged. It is not Prepublish's writing, not a summary, and not a re-transcription: it is the video's own published captions. English captions, published by the channel, in the video’s original language. Source: the video on YouTube. A channel that would rather this page did not exist can ask for its removal through the contact page, and it is removed.
No Script X-ray for this video: YouTube shows a Most replayed graph only once a video has enough views.
Hey, what is up everybody, Jason here. Today we are going to be taking a look at this scale LEGO model of the Canadian Museum of Nature which Kristal and I have been working on. This building is of course located in Ottawa, which is where we live, and this is part of a project our local LEGO Club has been working on to recreate certain iconic landmarks in the Ottawa region. Kristal and I decided to do the Museum of Nature because it is one of our favorite museums in the city.
Not only is it a really cool building but it also has a lot of cool stuff on the inside. Now, as you can plainly see, this model is not complete. In fact it's not even anywhere remotely close to being complete but I thought it would be cool to make a quick little video discussing the overall design of the model, what we've built so far and what we have planned for the future. As far as scale goes, this model is about half minifig scale, which is about the scale of these little micro figs, which were originally released as part of the LEGO game series, and I'm actually not a huge fan of these figs in general, but they are the right scale for the museum, so we probably will put a lot of these around the model.
We can also use these little trophy figs, as they are a good size for children, which, there tend to be a lot of children mingling around the museum as well. If we add some minifigs in here, you can see how disproportionately large they are. In fact, they would not even be able to get into the doors. When we were originally planning this project, we did briefly consider building it in minifig scale, but as this model stands now, it is just over five 32x32 base plates wide and 2 and 1/2 base plates deep, which is about 130 by 64 centimeters, or just over 2x4 feett, so if you consider in minifig scale it would be twice the size in each dimension, it would be absolutely enormous, and just way beyond the scope of what Kristal and I would be willing to work on.
In the end the scale of the model was dictated by the windows. It turns out this 1 by 2 by 3 brick high brown window pretty accurately represents the windows in the actual museum, so all of the architectural elements were basically keyed off the dimensions of this window relative to the real thing. And with the exception of the roof, we've pretty much finished the design of the building itself. For example, this is what the tops of the towers will look like, and this is what the second and third floor windows will look like.
Of course, one of the major architectural elements of the building is this rectangular glass structure above the main entrance, and in the actual Museum it does have a very light blue tinge to the glass, so we originally decided we would build it in this Trans Light Blue LEGO color, but it's actually quite a bit bluer than in the real thing so we're not actually 100% decided on it. We built this glass rectangle in trans clear as well just to see what it would look like, but it still doesn't quite look right.
I think the light blue tinge is pretty iconic to the building, but if you have an opinion feel free to leave a comment and let us know. We probably won't decide until the very end since it's really hard to tell what it'll look like without the entire building being complete, and to be honest we might actually bring both with us when we display it publicly, because it will be really easy to swap out the glass even on the finished model.
And then we can swap it out throughout the day and see what other people think as well. The grounds around the building are also pretty much complete in terms of design, we've just got to add like the vegetation, there's some trees. There are a bunch of lamp posts around as well. We're just not really adding these yet because they are really easy to knock off as we are working on the building as for the interior of the building, we had always planned to do some kind of interior exhibits, and to that end we decided to make these wall panels removable, so that you will be able to see inside.
And even though the exterior of the building is in 1/2 minifig scale, we decided we really wanted to make some mini fig scale displays on the inside as well, and the mix of scales might look a little bit wonky we're not really sure but we'll see how it goes. It's just much more fun to build minifig scale displays you can add a lot more detail and have a lot more fun with it and on this side we're going to have the fossil display at the bottom, and you can see I've already done the panel mount of the Edmontosaurus.
It is actually missing a few pieces in the right colors but they are on their way. Kristal Styracosaurus skeleton which will go on the right hand side there, and here is the skull for it. Again, right now it's a little bit multicolored, all these pieces will be swapped out with dark brown or reddish brown pieces once they arrive, and we'll probably add another little fossil display in the front here for the Minifigs to look at.
On the other side we will have the water gallery on the bottom with the signature blue whale skeleton that's in the actual museum, and this skeleton takes up pretty much the entire space we have for the gallery here so we won't really add much else other than the little display cases they have around it on the bottom, which will showcase a lot of stuff that's in there as well. They have like coral, seabirds, some fish displays, some crabs, etc.
A lot of sea life related displays and then above this water gallery, we will have the Earth Gallery on essentially the second floor of the interior. Since Kristal is a geologist, it will be really exciting to populate that with a lot of rock and mineral displays. And on the second floor of this wing, we haven't really decided which gallery we'll try and recreate yet. Either the arctic gallery or the mammal gallery, I think.
Again, if you have a preference, please let us know in the comments or some ideas of what to put up there. And, as we continued working on the interior Kristal had this brilliant idea to add some little Easter egg vignettes onto the wings of the museum. So, for example, on this side we have this little ocean scene with a dolphin in it and of course she needed the dolphin to move as well, and then in the back of this wing we will also have this swimming shark, as well as some other decoration stuff.
I don't know what will end up over there yet, and on the other wing we'll probably have some dinosaur related things, for example this pterodactyl that will go up and down, and I'm not really sure what else we'll have over there. Still to be determined. Of course, this will add a little bit of complexity to the model. I already had to modify the foundation a little bit to toute the mechanics through the base. So there will be one central motor that will actually drive all the animation on each wing, with the drivetrain running through the foundation of the model.
We also realized that it will be really hard to see any of this once the building is complete, because it'll be really dark inside, so, we were kind of on the fence about adding lighting originally, but obviously this makes it pretty much necessary to add lighting on the interior, so that you'll actually be able to see all these things when you look ins inside the windows. For lighting, I think I'll be using these led strips.
They're actually pretty low profile, pretty thin, they can be cut to different lengths and easily spliced together, so you can really customize the layout of the lighting, and they offer some nice continuous lighting. Here, let me just turn it on. So it's like a really nice continuous light strip, and if we put it on top and look inside the windows, people will be able to see these fun little Easter eggs. Of course, there are no swimming dolphins or sharks or flying pterodactyls in the actual museum, but these are just intended to be a little thematic Easter eggs for people to see if they take a closer look.
And, of course adding lighting in general just enhance the display of everything, including the main exhibits as well. And the last big interior component will be inside the Queen's Lantern. Now, in the real building right now is the moon, and they also have the Earth inside the main atrium, but before they had the moon they had this jellyfish, which Kristal and I really liked and I happen to have this mechanical jellyfish I designed a little while ago so we think it'll be really cool to mount this inside glass and have it running.
I think it'll look pretty cool I think we're also planning to do one other little Easter egg with the bugs alive exhibit in the back, but we haven't even started that yet. The only other major design element I wanted to mention is that the entire building is modular, so it does come apart and actually it comes apart into seven sections, although only three major ones and I'll just show you how the wings separate from the center section.
They actually just slide apart like so and it's actually pretty straightforward. They're just connected with some axles. The only complexity that really adds is for the lighting and the mechanics. So, obviously we'll have to have some quick connectors for the wiring for the lighting, and for the mechanics the drive axles will just be joined using some axle joiners so that they'll be easily separable and they can easily go back together as well, like so.
And that is about all I wanted to show in this video. I will probably make another long form video when this building is finished or at least close to being finished. In the meantime, I have posted some shorts about how some of the architectural features have been built and I will probably post some more as we finish off some of the interior details. I've also done a couple live streams of building this, and I probably will do a couple more of those.
As always, thanks for watching, keep on building, and I will see you in the next one.
The words are the caption track's own and nothing is reworded or re-transcribed. Paragraph breaks are placed between sentences so the text reads as prose.
Free tools for your own script. No signup, no login.
Paste your draft and see where viewers are likely to drop off, with a rewrite for each weak line.
Paste the first 30 seconds of your own draft for a hook score and rewrites.
Check your draft against YouTube's advertiser-friendly guidelines before you record it.
Read this channel's public videos and transcripts, and download a writing brief for it.