Getting the transcript
Reading the captions from YouTube. A video nobody has opened here before takes 10 to 30 seconds; this page fills in on its own.
Getting the transcript
Reading the captions from YouTube. A video nobody has opened here before takes 10 to 30 seconds; this page fills in on its own.
Stefan 3D AI · @stefan_3d_ai
This video has no Most replayed graph yet: YouTube shows one only once a video has enough views. These are the moments viewers replayed most in Stefan 3D AI's most watched videos.
Most replayed moment at 4:08
7.0x that video's typical replay level
and it will also have the access to full ai apis. Now let's do some serious tests. The first test will be to do an animation of a character that will be split in parts. The first test will be to create animation. Animation of a character that will be an
Said at 4:01
Most replayed moment at 9:39
5.7x that video's typical replay level
Overall I think this guy's made really amazing job, bring it it all together and I really had a lot of
Said at 9:41
Most replayed moment at 20:36
4.1x that video's typical replay level
Just also because I was playing that game when I was kid. Okay, let me see if I remember how to play that. Let's start with the road, right? Let's try to build a, oh, there are cars. There are cars. It generated nice cars and they're like, wow.
Said at 20:29
The graph counts replays. It does not show where viewers stopped watching.
Words
2,721
Runtime
15:46
Speaking pace
173wpm
Reading time
11min
173 words per minute, between the 160 25th percentile and the 181 median of 349 measured videos. That distribution comes from the 349-video hook study.
Opening (first 30 seconds)
If you want nice 3D character, you first need good reference images. Today I'll show you exact 4-step system I used to create best references for creating production-ready character sheets. The same workflow I used before any 3D generation in all my videos before. And I also show you how I optimized it even further. So this is not only about creating cool AI arts, this is about creating references that are usable to create 3D models. References that will save you a lot of time and
87 words, the words spoken in the first 30 seconds at 173 words per minute.
Free, no signup. See how the first 30 seconds hold attention, with rewrites.
Sentence shape
| Measure | This transcript |
|---|---|
| Sentences | 329 |
| Average words per sentence | 8.3 |
| Longest sentence | 37 words |
| Questions asked | 1 |
| Sentences containing a number | 24 |
Most used terms
Filler phrases
86 in total: like 53 · actually 13 · sort of 7 · basically 6 · I mean 5 · you know 2.
A literal whole-word count of the same phrase list the Prepublish browser extension uses, so a phrase inside another word is not counted and a phrase used in its ordinary sense still is. It is a count and not a judgement.
What this transcript is
Every word below is the caption track YouTube publishes for this video, pulled from the video itself and reproduced unchanged. It is not Prepublish's writing, not a summary, and not a re-transcription: it is the video's own published captions. English captions, published by the channel, in the video’s original language. Source: the video on YouTube. A channel that would rather this page did not exist can ask for its removal through the contact page, and it is removed.
If you want nice 3D character, you first need good reference images. Today I'll show you exact 4-step system I used to create best references for creating production-ready character sheets. The same workflow I used before any 3D generation in all my videos before. And I also show you how I optimized it even further. So this is not only about creating cool AI arts, this is about creating references that are usable to create 3D models.
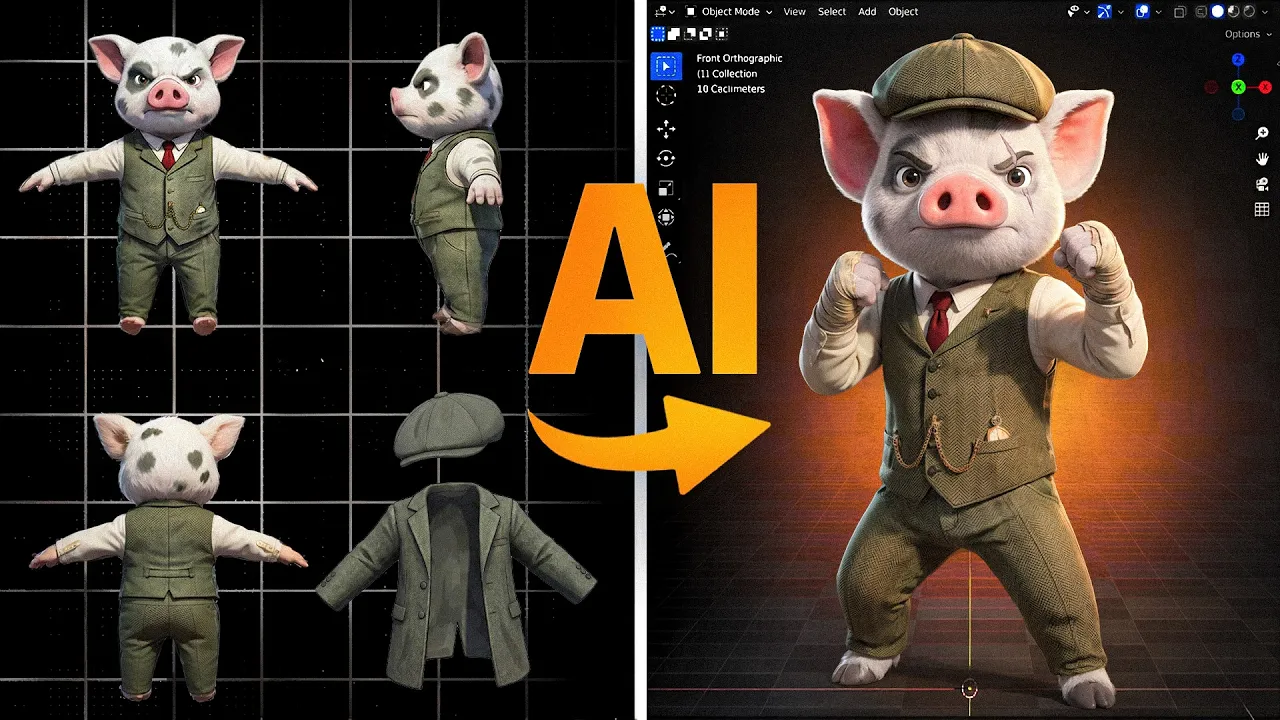
References that will save you a lot of time and make it possible to achieve complex goals. Whether that's characters or props. There are 4 clean steps in my system. The first one, ideation. The second one, clean character sheet, splitting into parts, which is optional. And creating views. Now when that's clear, let's start. Okay, so for the first step, ideation, of course, I use ChatGPT or anything else like that. You can use Claude maybe, you can use Gemini, also very good.
I still think GPT gives me the best results. Ideation can be split in two sub-steps. Where you know the exact idea and you just need some visual reference. Or you don't know the idea and you're just brainstorming the direction and you first need to get the ideas. We will assume we already know what we want to build. In my case, I do have Mr. Mark and he has this nice blinder. Of course, that's reference to Peaky Blinders.
So now I want to create something really cool. It will be a humanoid piglet that will mix Peaky Blinders style with Arcane style. That's probably two of my favorite Netflix series. Well, here's how I do that. I basically open ChatGPT and tell it. All right, bro. So I want you to create me images of a fantasy character. Well, yeah, I stopped using keyboard for a while already. And you might see that I actually asked it to use Nana Banana.
But ChatGPT doesn't have Nana Banana. It has ChatGPT image. Well, this is because I'm using Abacus AI, which has all the models. And they basically can work within one chat context, which is absolutely cool. Before I had few subscriptions like ChatGPT, I used Nana Banana either on Google or full AI. And that was actually quite expensive. Right now, only for $10, I can have it in one place. And you can see, I can ask ChatGPT to use Nana Banana right away.
Of course, you can just create prompts and then use that prompt somewhere else. You will have pretty much the same result, but I just have it faster. Also, if you click on any image here, you can see the prompt it used to actually call Nana Banana. And here we can see it created four images as I requested. For this step also, you can use pretty much any model. Not only Nana Banana will do the job. I mean, I know people like Mid Journey.
I mean, use Mid Journey if you're used to it. The goal of the first step is to create a reference image, not an A pose or T pose, just something that you like, the character itself. So I'm not really happy with the results. We're going to improve it further. So for this one, I'm going to make a photo of Mr. Mark and send it here and give some comments. Okay. So I'm going to attach two images that I just made and I will provide some comments.
This step is actually the most difficult to me right now to find out the idea that actually clicks. All right. So for voice input, you can use whatever you want. On Windows, you can use Win H button to input voice. I use Whisper. You can even run it locally for free. Also in Abacus desktop app, you can have this voice input. And guys, when you're used to it, that's insane. There is no way back. Okay. We're moving closer because at least I have something that I like.
In this case, I recommend you to collect and iterate on pieces that you like. So let's say I'm going to download it. This is not the reference I'm going to use, but it's something close. I'm going to take this one. I'm going to input it again. And I also found another reference that looked more styled. And I also going to input it and say to refer on this image in terms of style. Okay. So I finally got some reference that I pretty much like, but it must have more traits of the photo I attached.
And then I actually went wild on the prompting. So from this, I actually ask it like to make it like more sad at the scar. Then I didn't like this result. I tried again. And here you can see, I asked to make it more sad here, like for a few more variations. This one was actually more close. I asked it like to add some fur on hands and stuff. Then I moved further. And at some points, yeah, I asked like to make it like a little bit more sort of 3D-ish.
At some point I was even angry. Why it not creating like the style that I want. And yeah, I mean, I'm arguing with AI. Then I actually got an idea and I just attached a Jinx reference here and said, like, can you transfer a style like over cane? And I finally got what I want. Guys. Yes. This is what I need. Okay. So this is basically pre-final prompts. Gonna save it. And now we are slowly moving to a step two, which is to create a clean character sheet.
Okay. So I can upload an image and the next step is basically to put them on the white background, remove all the objects that we're gonna need and define the objects that we might need. Okay. So here's the final reference that I like. First, make his fur white primary. Only nose and ears are pinkish. Second, I want to create 60 to nine image where there will be a character in a pose. It will be a blinder separate and a coat separate as well.
So there will be three elements on the horizontal canvas. Sort of use this input exactly for the Nano Banana Pro and create me two 60 to nine images that will be on a solid white background showing like the full composition, like breakdown on my character. While this is creating, let me show you some other references. I create and explain logic behind it. So for example, here is another reference that is considered like a step two results.
We do have like a final character and the prop. And this image is used to create parts and to create views. But what this image does, it ensures the consistency of all the elements. Sometimes if you try to create a jacket and the character separate, they might not fit the size, style and so forth. And from that image, I was able to extract character alone with all Nano Banana. Basically, everything I will show today was created using Nano Banana.
Then I created the mallets alone. And for character, I was splitting it into some parts like the body without head, the head itself, the hand, of course. Then I created the 3D image of each and combine them. And we are finally having it. Now I'm actually happy with the result. There are two images it created. I will go with this one and that's my final one. Now there is two way how we can process it. We can either create back a combined character and do prompts such as like extract the code, extract the blinder and so forth.
Or we can use this image to extract it. That might give the pretty much the same result. So let's do that. For this, you can use again Nano Banana. You can use a QWEN image if you want like local models. Pretty much any editing model will do the good job. You can do that in Google AI Studio. But since I'm using Abacus AI, I do have a cheat code how to do that. All right. So I do have my final image right now. Extract the character alone from this image on the 1 to 1 proportion image on a solid white background in T-pose.
And I'm gonna need you to do the same thing for the coat and for the cap. Okay, I probably said too much, but yeah, just in case. A-pose is good for prototyping just to keep things generated more naturally. But for actual 3D generation, we definitely need T-pose. Just because for rigging, it will eliminate some problems. So here we already have first image created. And this is absolutely amazing. It actually failed with the coat for some reason.
Okay, let's give it a try again. Okay, we are almost here. It just needs to be in T-pose. For garment, it usually struggles to put in T-pose. I'm gonna try again to put it in T-pose and that will be the final. Okay, so I tried another AI and it still give me sort of A-pose. But that's fine. We have it extracted alone. That can be easily fixed on 3D. So I'm not gonna continue messing with it. So to recap, we already have our character sheet.
We extracted all parts alone since we decided to go with parts. For simpler character, of course, you might not need to separate it. Or for more difficult characters, you might want to separate it in more parts. Like hands, head and so forth. In my case, I want to separate the garment. And the final step, of course, is to create a multi-views. If you really need it. For coat, I will not create it because it's pretty clear what's on the back.
There's nothing fancy. I don't want on the back some special text or anything like that. If you want, however, then you need to create a back view. I'm gonna do that only for the character. And I usually do that exactly the same way. I need a back view of this exact character in same pose. Do not change anything. Just create a back view with Nano Banana Pro. I know some people also create side view. But I also create side view on demand.
It doesn't really help fixing the hands problem. Someone recommends to show the hand palm like this. That might work, but might not work as well. When it comes to 3D generation. So in my experience, I just use right 3D AI to avoid it. Or it's just separate hands to get 100 % nice results. You might also be a bit frustrated. Why I'm not showing how I'm using local models. And Comfy UI and stuff like that. But I'm just not using them.
The last time I opened Comfy was maybe like two months ago. When I tested like AI to animation. And that was pretty cool. And since I have a lot of things to do. It's simply faster to me to have one context. When I just provide a feedback to review result and so forth. When I'm in serious mode, however. I can go to full AI and use it at max. But that will cost me way more than, for example, on advocacy. Here I'll pay per image.
And I usually did it like this. You can see it in my other videos. We can do like this. And I usually use four. So I can immediately select which one is works best for me. So in this case, something like this will do. So I'm going to download the image and we can continue. Or you can create it here. Pretty much the same results. And if you want to try it now. The link is, of course, in the description. It is only 10 bucks per month with access to all top models.
Including image models. You can also create your custom workflows and bots. And do automatization all in one place. Take a look. Okay. Same way. I created the side view just to highlight. There will be only four fingers. Let's see how 3D AI will handle that. That's not a problem for rigging. Let's say Mixamo support four finger creatures as well. And to do a recap. Here's what we created in this video. There was ideation stage.
Here's the images that we went through. From the idea to the final concept that I like. Then from the final concept. I created a final character sheet. Again, remember this can be one final character on white background. Maybe with his weapon. The whole idea here is to have one image. That contains complete information about the character. If it's like a simple character. It can be done in this way. Next step. Separate parts and separate image to use on generation.
Right. So we do have coat. We do have a flat cap. Okay. Blinder. And the character itself. And the last step. We created views for those objects that we need. In my case. That will be only character. And I created some views. So now let's jump into 3D AI and cook some stuff. I also gonna drop a link in the description to a notion page. When I explain my four step system in details. Like you can use it. You can use it as a prompt.
I'll be happy to be helpful. I can create 3D models in Hunyuan and Tripo. And let's review the result. If you want to know the best 3D AI model. To bring your character to 3D. Watch my another videos. I mean I covering them a lot. I compare them. And I also created top3d.ai. Where you can see a leaderboard. And which 3D AI performs the best. Can also go to compare mode. And see some specific prompts. And see how different AIs performs.
And what results they provide. Okay. So we finally have the results. And here's our character done in Hunyuan. And it looks quite quite good. In my opinion. The good reference make a difference. It looks good. We can definitely work with it. Here we go with the cap. Absolutely amazing. You can basically use this cap. Just optimize it. And put it on the character right away. And here we have the coat. So there's a little bit of problem with the shading inside.
But that's not a big deal. Since that's inside. Otherwise it looks absolutely cool. The shading is even better than I expected. And let's review the same in Tripo. Okay. So I think Tripo actually gives better fingers. You know. Like it's more distinguished. Even like without specifying. Like I really like it more. Sort of. And the texture PBR is more colorful. Sort of like. Yep. You take a look. And let me know in the comments.
Which result you like the most. I probably go with Tripo. I think in terms of details as well. Let's take a look on the coat. Here we go. Also a good job. I think maybe here. Like if we take a look on the texture. It has sort of less artifacts. And more consistence. While this might look cool. Like sort of styles. Right. Also very good job. But it might be a problem. Since these areas are like too dark. On the animation.
In Tripo it is more consistent. And for animation. When like hands go up. This one is actually better. So the cap. I definitely like more in Hunyuan. Since like it's a hollow inside. It should not be like that. I mean that's probably not a big deal. Since we're gonna put it on the head. But yeah. This is like more correct. Right. And maybe even shading. Like shading is pretty much the same. So here you go guys. I hope you enjoyed the video.
You learned something new. And let me know in the comments. If you want more insights like this.
The words are the caption track's own and nothing is reworded or re-transcribed. Paragraph breaks are placed between sentences so the text reads as prose.
Free tools for your own script. No signup, no login.
Paste your draft and see where viewers are likely to drop off, with a rewrite for each weak line.
Paste the first 30 seconds of your own draft for a hook score and rewrites.
Check your draft against YouTube's advertiser-friendly guidelines before you record it.
Read this channel's public videos and transcripts, and download a writing brief for it.