Getting the transcript
Reading the captions from YouTube. A video nobody has opened here before takes 10 to 30 seconds; this page fills in on its own.
Getting the transcript
Reading the captions from YouTube. A video nobody has opened here before takes 10 to 30 seconds; this page fills in on its own.
Stefan 3D AI · @stefan_3d_ai
This video has no Most replayed graph yet: YouTube shows one only once a video has enough views. These are the moments viewers replayed most in Stefan 3D AI's most watched videos.
Most replayed moment at 4:08
7.0x that video's typical replay level
and it will also have the access to full ai apis. Now let's do some serious tests. The first test will be to do an animation of a character that will be split in parts. The first test will be to create animation. Animation of a character that will be an
Said at 4:01
Most replayed moment at 9:39
5.7x that video's typical replay level
Overall I think this guy's made really amazing job, bring it it all together and I really had a lot of
Said at 9:41
Most replayed moment at 20:36
4.1x that video's typical replay level
Just also because I was playing that game when I was kid. Okay, let me see if I remember how to play that. Let's start with the road, right? Let's try to build a, oh, there are cars. There are cars. It generated nice cars and they're like, wow.
Said at 20:29
The graph counts replays. It does not show where viewers stopped watching.
Words
5,671
Runtime
30:46
Speaking pace
184wpm
Reading time
24min
184 words per minute, just over the 181 median of 349 measured videos. That distribution comes from the 349-video hook study.
Opening (first 30 seconds)
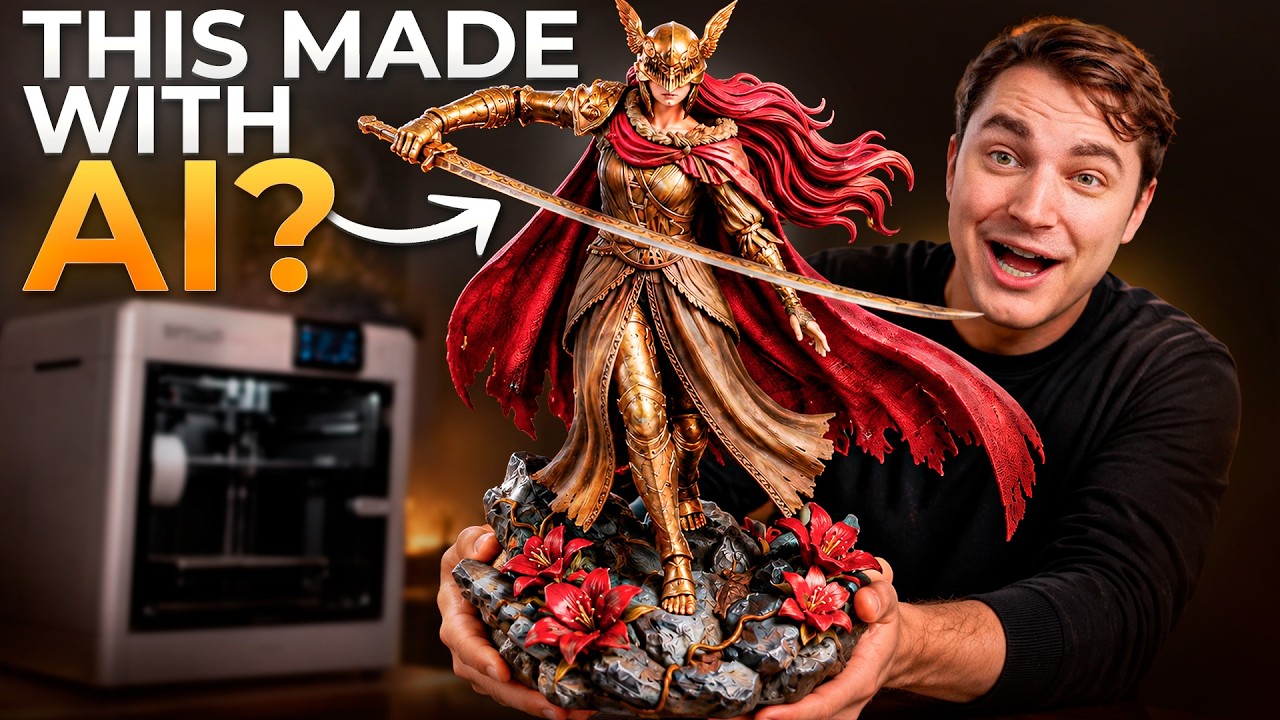
This beautiful 40cm multi -powered figure was made with AI tools in less than 1 hour. You probably already heard that AI can be used for 3D printing, but it only works for small and simple models. Well actually it's way beyond that. Especially with right approach and right tools you can print anything. And today it's time to do a complete breakdown of AI workflow for 3D printing. We're gonna cover all the details that you need to know and 3D printing is more than just preparing a 3D model. We're
92 words, the words spoken in the first 30 seconds at 184 words per minute.
Free, no signup. See how the first 30 seconds hold attention, with rewrites.
Sentence shape
| Measure | This transcript |
|---|---|
| Sentences | 503 |
| Average words per sentence | 11.3 |
| Longest sentence | 43 words |
| Questions asked | 15 |
| Sentences containing a number | 26 |
Most used terms
Filler phrases
148 in total: like 92 · actually 26 · basically 14 · right? 6 · you know 6 · sort of 3 · I mean 1.
A literal whole-word count of the same phrase list the Prepublish browser extension uses, so a phrase inside another word is not counted and a phrase used in its ordinary sense still is. It is a count and not a judgement.
Run the check on the words above: where attention is likely to drop, with a rewrite for each weak line. The free check shows the scores and the one issue costing the most.
What this transcript is
Every word below is the caption track YouTube publishes for this video, pulled from the video itself and reproduced unchanged. It is not Prepublish's writing, not a summary, and not a re-transcription: it is the video's own published captions. English captions, published by the channel, in the video’s original language. Source: the video on YouTube. A channel that would rather this page did not exist can ask for its removal through the contact page, and it is removed.
This beautiful 40cm multi -powered figure was made with AI tools in less than 1 hour. You probably already heard that AI can be used for 3D printing, but it only works for small and simple models. Well actually it's way beyond that. Especially with right approach and right tools you can print anything. And today it's time to do a complete breakdown of AI workflow for 3D printing. We're gonna cover all the details that you need to know and 3D printing is more than just preparing a 3D model.
We're not only gonna talk about preparing images, generating model, assembling them together, but also how to split it into the right parts, set connectors and even we're gonna touch up on multicoloring printing and what is the fastest way to approach that. And of course along the way I'm gonna show you how I created this amazing Malinia from Elden Rings. Get your snacks, hit that like and subscribe button if you're still not, I really really appreciate your support guys and let's get started.
As a starting point I got this image prepared. I don't want to talk about like how to do the ideation part etc. Well I also covered that on my channel, that will be a separate video. You already know what you want. And here comes the first challenge. To generate this at once with 3D AI or work with one image there are a lot of problems that will make your life very difficult. Overall working with AI in different pipelines and workloads.
Most important thing is that you always want to have more control over what you create and for that one we cannot split that into the parts. That's quite easy to do and the logic is very simple. You split it into the logical parts the way you're gonna assemble that later. Especially in my case I use Elego 16K and the printing area will definitely not fit this whole figure and my printer is not multicolor. Therefore I'm gonna print it in parts anyway.
And for printing if you're gonna paint it later there's additional layer of thinking like how I'm gonna paint it. Here's what I'm thinking. I got a separate base, flowers, probably legs, definitely separate head, hair, coat for sure. I really want coat in hair as a separate meshes maybe with some dovetail connectors so I can easily paint hair. Then there will be body and maybe a separate hands. That's what I was thinking and then I started to do the extra image references.
You can do that manually with Nano Banana Pro or GPT Image 2. They're both really good. One recommendation is that Nano Banana Pro is for more stylized object if you use it for generation as well and GPT Image 2 is very good as details. But sometimes too much details is also not good. So play with them and you're gonna know which one works best for you. And here's the final list of parts. All of this I'm gonna generate separately and then assemble it in Blender.
You might see that I generated heads and helmet separately. That's because I want a little bit more flexibility. And I was thinking that connector of hairs will go inside of the heads. So I probably keep them separate. And again, the logic of splitting parts is not only how you're gonna print it or paint it. It also can be just easier for you to tackle the details. Generating parts separately, you can always join them later.
While generating individually will give them more details and will be easier to work. Very nice. Next step, generation. I'm gonna use 3 .0 3 .1 because in my opinion and not only my opinion, it's still the best AI generator out there. There is an amazing leaderboard called Top 3D AI specifically for these things, where you can find like which one is the best for different purposes. So far, 3 .0 3 .0 does a really good job, especially from my experience.
It follows the prompts nicely. It really understands the shape and tries to make it logical. It is also good for games that you can create low poly. They recently dropped a big update. But for 3D printing, we only need HD model. We wanted high poly because we want a lot of details and we're gonna process that models and sculpting works best with, again, high poly. It doesn't mean we cannot optimize it further for printing when it's ready.
That's completely separate subject. And just like that, I generated all my models. I was using this settings, ultra mesh quality and max amount of triangles. And I removed the texture because I don't really need a texture. And that also saves some credits. And if you also want to try 3 .0, there will be link in the description. You're going to get 503 credits. And if you like it and decide to buy subscription, there is a promo code for 60 percent discount.
And now let's bring all models to Blender. When I generate models with texture, I export them as GLB. But since we only have meshes, we can also export it as a VX. And that sort of preserves some stuff in a better way. And here we go. I drop everything in Blender. Let's see what parts we get. Now, guys, we're going to do some processing. And here, first of all, what you need to understand, there is plenty of things that you can do with Blender.
It's a complete 3D software. However, depending on the purpose, you might need to only master few tools, like few brushes, few approaches that will give you so much freedom in what you create. Specifically for printing, there is a sculpting mode that allow to do any magic, like adjust everything, et cetera. In this video, I'm going to break down just three tools that we're going to need to do a lot. However, I will not cover like most basics, how to rotate the camera, et cetera.
I already did a complete video about that. Take a look. The link will be somewhere here. Now, before I explain tools that we're going to use, let me give proper names to my parts. And I also set my space units to millimeters. And with measure tool, check what will be the 40 centimeters. That will be 400 mils. So my model should not exceed this size. Now let's talk about the tools. First of all, by default in Blender, you are in object mode.
Now here's the simple sphere that I created. You can, of course, do some manipulation with object, move the object around, rotate, et cetera. Now in top left, there is a mode menu where we can switch to sculpt mode. And the sculpt mode is basically special modes to work with high poly models, where there's a lot of polygons. The easiest way to understand is imagine you're working with clay. And surprisingly, there is actually a brush that is called clay.
So when you paint over, it adds volume. If you paint over while holding control, it will actually remove the volume. And there is a reason why it's called clay. And most of the brushes are pretty intuitive. For example, there is a smooth brush that we can press and smoothen some transitions. I mean, it's very useful again, especially when we process AI generated meshes. We might need to smooth some transitions, et cetera.
You can add some volume, smooth some volume. There is plenty of different brushes that you can play yourself. I want to introduce one interesting called inflate, or it also can work as deflate. If you hold control, that might help to close some gaps, et cetera. And my favorite brush of all time is of course, grab and elastic grab. Basically grab, take some part and sort of extend. Elastic grab is more graceful. So it takes into account all connected meshes.
And with elastic grab alone, you can actually align, assemble, all parts together and get like the nice character done. Now, another tool is so -called Boolean tool. In Blender, it is a modifier and it works this way. So basically you have an object and you go to modifiers and add this Boolean. And it allows you to basically join or subtract object that you select. So let's say I'm going to select another cube that is intersecting.
And with union, basically it will create a new unified shape. If you apply modifier, it basically gonna bake it. And yeah, you're gonna have a new mesh. But in this tutorial, more often we're gonna use a difference to cut some shapes. You might guess it is very useful to create groove connectors, dovetails, all that things. Basically all dovetail connectors we're gonna create like this. And one more very, very useful tool will be masking.
Masking available in sculpting mode. And there is different way how you can use masking. It can be mask brush. It can be box masking that allow you to select from projected view. Or there is one of my favorite laser mask. Just press here, hold and select laser mask. And you can draw anything, like select some part. Why use masking? All masking area will not interact with brushes. So you can prevent from movement some area.
But another use case that pops more often is to cut some parts. Let's say here is the masking area. I'm gonna go to mask, mask slice and fill holes. Boom, and here we go. And you know what? That's pretty much it. There will be one more thing that I'm gonna show you better in the process, which is called mesh remesh. But I better explain it along the way. Now I have all my parts. Blender named nicely. First thing I'm gonna do add image reference to the background of my Blender viewport.
How do I do that? Right click anywhere, select image, reference. Then select your reference image and it will be added here in Blender like this. The cool thing again, like even in solid mode, you're gonna be able to see it as an image. This helps me a lot to align parts nicely. Always make sure that I keep proportions right, etc. It's possible to do that without it, but I'm always lost in proportions. So the first thing I'm gonna do is position the objects, right?
At this stage, I will not use a lot of tools. I gonna just position objects. I use some of the height keys, but again, all of that is also possible with transformers. Take a look on that beginner's video. It will help you to get used to these controls. Trust me, it's much easier. Also to not get lost, you can always see what buttons I press here on the left. All right. And just like that, I have all my parts in place.
Of course, they are not perfectly fit and that's fine. We're gonna adjust that in sculpting. But first of all, let me explain one technical detail. When you do any scaling, etc. It is written into objects scale and rotation. And that might cause some technical issues working with some other modifiers. So I recommend after any significant scale rotation operation, select all the models, control A and rotation and scale and apply rotation and scale.
That will basically say that the current scale and rotation is the original one. And all modifiers will take that into account. Now we can finally go to the sculpting mode and we can have fun and start processing our models. I'm gonna start with flowers. Well, I actually need some volume here because there will be a dovetail on the back. How I want to print flowers separately and small dovetail. Boom. I'm gonna show you how I added later.
So with the clay brush, I'm gonna just add some volume here. There is an amazing hot key F while holding, which you can always adjust the size of a brush. Or you can do that here on top menu in radius. Another very useful approach and also benefit of working in parts. If there is some part that is covered by other parts that you need to take care of, you can only zoom to that specific part by selecting it in object mode.
Just select it and press slash on the keyboard that will isolate it. And you can press it again to go back to see all the models. And here you can see I'm actually like smoothing the chin. By the way, the smooth brush is a brush that you're gonna use most often. And therefore developers created a shortcut while using any brush. If you press shift, you're gonna switch to smooth brush temporary. When release shift, you're gonna continue working with the brush that you selected.
And here you can see I'm using actually my favorite elastic wrap. You know, proportions of AI generated models can be always a little bit off. And there might be many reasons. One of which is the reference images and the view of the reference image is not always right. So I'm gonna spend some time, go over some details, smoothen them, change proportions. You can see also helmet was I guess like a bit too big in the forehead area.
And now let me show you one challenging part that was very interesting to address. It was about hair. So first of all, again, I needed to position them right. And you can see I'm using again elastic wrap. That's like so powerful tool. What I did like a position here first. And then I also adjusted the shape of the helmet itself. So there is like a space for the hair just like that. So you can see. And then I enable it all together and just, you know, like up, up, up a little bit.
And also for hair, I could not allow it to be too thin. So I added a little bit of volume with clay, right? So I isolated here and on the inner side with clay, I added volume because there will be a connector, a dovetail, right? OK, now it looks much better and it's connected to the head. And I started to think like how exactly I'm going to put it. The thing is, if I create a dovetail, it might be not enough to hold this big hair.
So I decided I want to cut the head in the half and create nice groove. And that groove will have great slots for this connector. But before that, I need to do a few things. First of all, I'm going to cut hair by the head. And here we're going to need that boolean operation, right? Because that will be a separate object. And I'm going to just add boolean to the hair and select the heads. By the way, you're going to see one interesting trick that I'm going to use.
Whenever I'm going to cut, for example, heads from the hair, I'm going to duplicate the head, scale it just a little bit. And use for a cut, not original head, but that little bit scaled. Why? Because I want this small gap later when I'm going to print it, I'm going to paint it. There will be extra mill that might make it very difficult to connect parts tight. So that's basically experience. Now, how do I create this groove and the connector?
So I'm going to create simple cube, shift A or right click anywhere and select the cube as primitive. Now, I'm going to position this cube. Basically, cube is just a flat surface. And since it's solid, I can use it for boolean operations. You can use sphere or any other primitive. Just make sure it's solid. So I think my cuts will happen somewhere here because that part anyway, we're going to be covered with the helmet.
And I'm going to select heads and select boolean indifference for this head. So we can see here is the results. We can actually preview that we can hide the cube. And I think, yeah, that's exactly what I need. So there is enough thickness of the hair. And I want this group to be like this and the connector on the hair. So this construction should hold solid. Don't forget to apply boolean modifiers like this or control A when you hold mouse over the modifier.
Boo. OK. All right. Now I need the helmet to fit that right now. It's hollow inside, right? So there will be extra space. I want it also like fit nicely to this flat area so I can just glue it later. Right. So my idea, I take head, plug the hair and then glue it all together with the helmet. How about that? And you might guess the way I'm going to do that. So first of all, you can add some clay inside like some volume inside the helmet.
Then we're going to duplicate the head. We're also going to like scale it a little bit, just little bit overall. So there will be like a very small gap. Then we're going to select helmet. Select that head 002, well, that duplicated head. Wait a little bit. And yeah, now we have it. Yeah, of course, later you can smoothen that transition and sculpting mode with smooth, etc. But that's the idea. Now we have like two parts sitting nicely.
All connectors we're going to do a little bit later. So pretty much that's the process. If you lack of some details, you can go generate some models and bring them here. Like you already know how you can join them. Actually, let me show you this join case. It's not necessarily done with Boolean because in sculpting mode, we can also join the objects and then recalculate them to be as a solid one mesh. So let's say you remember I generate heads separate and I already separated the codes and some parts here.
And now I want to join my heads with the body. Now it's like two objects, the heads and the body. So first of all, I'm going to position them to be close. Now we're going to go to object mode, select both of them with shift and just press control J, which is for join. Now we're going to go back to sculpting mode. And here is this magical thing. Remesh. You might need to select the right voxel size. Do not select it too low.
First try with bigger values. It will recalculate mesh on currently given surface. And after this operation, it will be completely new mesh that is like as one, which you can see made the transition like that because there is no two parts inside each other. It's now one new mesh and we can smoothen this transition. That's like that. This approach can be used in a variety of cases. Let's say I am lacking some details, maybe like I want to add armor here.
I'm going to go generate armor, put it where it should be, join it, remesh, and then it will be part of that object and I can do the transition, etc. Also, let me show you how I did separation of this part. It's like a scarf, but not really a scarf. I was using masking. So I showed you like with the heads, who was using Boolean to cut because who was using an object. But here to separate this one, obviously it will be very difficult to position any cube like this.
So I'm going to use masking. And in this case, I started with laser mask to start and then I used brush mask. Almost with any brush, there is control that you can hold to invert action. So let's say I'm painting and if I paint some area wrong, I just press control and sort of like cancel the masking. So just like that, I selected hold this area and there is two options. You can mask, slice and fill holes that will remove this object and fill that area.
That's what we did on the example. Or you can actually slice it to new object. Actually, the result is a little bit off. So what I did, I went back and I actually duplicated the object in mask. I inverted mask. It's very easy. You can press control A on or do that in mask menu and try to do the opposite. I cut everything except surf with mask, slice and fill holes. Here we go. After this operation, I'm going to do remesh just to smoothen that transition.
And yeah, we can actually smooth it a little bit here. And here we go. We have that separate. There's like plenty of ways how you can do that. Masking is very powerful. And again, like using it for slicing parts is very needed. Now, of course, later on, I also place it the cape on the body. So here's like my jointed head and I needed to add the cape here. And on top, this scarf goes. Since there are separate parts and I want to print them like separately and then just glue them like layer by layer.
There will be like body cape and this scarf on top. And like this approach will let me like print it easily. But there is one thing, of course, if they're going to go inside each other, if I print them separately, I will not be able to plug them. So, of course, I'm going to subtract each from another. So let's say I'm going to position this scarf on top of the cape and do the boolean, of course. So I'm going to select it.
Sometimes if the geometry can have holes or something went wrong, you might try solver like fast or exact to get better results. Sometimes with very high poly models, it might break from first attempt. Don't be too disappointed. It's all fixable. Maybe there is some area where you need to pay attention. And now my scarf basically has this groove to place this scarf. You can, of course, smoothen the transition a little bit later.
And I'm going to do the same thing for the body. And again, I do duplicate the cape and scale it a little bit just for that additional small gap. When I'm going to paint the model, there will be like additional millimeter on the surface that I want to make sure will not ruin my placement. Where will we are actually moving closer? Of course, I did more than that. Overall, I spent an hour and ten minutes in a Blender to prepare all of this together with the dovetails just to assure it's not a clickbait.
It's really that fast, especially if you do it a few times, it will be easier. But aside of the parts that I explained to you, mostly I was just using elastic wrap to position every object nicely, like make sure they are not intersecting. There is enough space just thinking like how we're going to plug things together somewhere, adding a little bit volume, fixing some gaps, smoothing some areas and so forth. And now we're ready to do the connectors.
Well, it's actually very easy. We're going to create new primitive, which is a box. Then I'm going to go to edit mods and switch to vertices and do very, very simple thing. I'm going to just narrow top part and actually extend the length. When it comes to printing, you're really almost never gone the polygon levels, except some strict shapes like a dovetails. But if something of this is unclear, I have a second lesson of that same tutorial where I explain how to work with edit mod low poly.
You can take a look here. But for sculpting, we only going to work with primitives such as this one. OK, now we're going to go to object modes. One thing I going to do is that I going to duplicate my dovetail and do one more bigger and use a measure tool to get the right gap. The reason is again the same when I going to paint models. I need them to not be like one to one. There must be some small gap. So smaller cube we're going to use to append to a target area and bigger cube we're going to use to subtract the size of dovetail and the gap.
It's very individual. I think you know better, like depending on how you print, like what materials you're going to use, what is the resolution of printing, etc. Let's do the first plug. Well, actually using dovetail here will be wrong. So I going to create a cube, just another cube. And I don't even need to go into the edit mode. I just going to position cube here nicely and scale it in object mode right away. Again, reminder, you can see all the hot keys that I'm pressing are here.
I basically press S and choose the axis by which I want to scale it. OK, so I think this will be the perfect position. And we, of course, going to have cube one, cube two, one bigger, one smaller. And smaller we're going to union or like join with the hair and apply that boolean operation. And for heads, we're going to subtract the bigger cube. And here we go. That's what I wanted. Amazing. And this helmet goes on top and I going to glue all that things.
Right. Well, that was easy. Absolutely the same thing we're going to do with everything else. First of all, again, like we must make sure before that one part doesn't go inside another. Like so that's why we can do the boolean, like, for example, arm and body. So there is no intersection. Then we just position our dovetail and make sure it is possible to connect them nicely. Every time is the same. I create the smaller one.
I create the bigger one. I just double check that the gap is exactly as I wanted. 0 .35 mils or you can prepare them once and just reuse them. But again, like after you scale them, reposition like this gap can be changed. So I was just double checking because I'm going to print it later. And I don't want like surprises when I print it. But yeah, you can see like the real, real preparation. So I did two dovetail connectors for arms.
Of course, for the body and the legs, a big one. Also, smaller one for legs. Actually, from my experience, it doesn't need to be like that big because there will be two of them. I just will make them a little bit extended and I don't want them to be very visible. OK, and later I also adjusted a little bit the shape of the stones so they fit nicely. So like she stands there nicely. Here you can see the gaps. I think that's more than fine.
We will see that later when I print and for the flowers, also small connectors. Of course, they're going to need to rotate it like the wrong direction. OK, so something like that. Absolutely the same process all the time. And that's it. I think we're ready to get this printed. But before we move to the printing, I promise that they're going to cover also multicolor printing. If you are lucky and you use filament printer, you do have like this coloring options Or you left the comments under my previous videos asking for this.
Here we go. Basically, color printing is based on vertex colors. And I'm going to use bamboo labs as an example. First, of course, we need to know how many colors do you want? If I'm not mistaken, like bamboo labs support up to 32 colors, but I never saw a printer with that much colors. At least consumers grade. Let's be realistic. We're going to do six colors. OK, so we have our model prepared. And now here in Blender, we can actually switch to vertex paint.
And the vertex paint is how you paint on top of the surface, on top of the vertices. And this vertex colors is actually what's bamboo lab breeds. It doesn't work with texture. It works with vertex colors. Additionally, I also ask Gemini to edit my reference image like if it will be only in six colors. Again, you can decide on your own what colors, where they should be distributed. I think it's pretty fine. And now here's what we can do.
In vertex paint, we can set those colors exactly. And we can actually paint on top of our model. You can paint with brush and assign colors. Or, of course, if like the whole part of the same color, we can just set the color. It's very easy. You can go to paint and set the vertex color or press Control X. And you might wonder why I'm not showing you like there is an AI that will do that thing for you. Well, when I was preparing for this video, I tested all of them, not only TRIPO, I tested plenty of them.
They do the color extraction based on texture. And I could not say that is very useful or I was getting any good results. So this approach was much easier to do. But there is one thing in Blender. If you go back to object mode, you will not see a vertex color. It will be only visible in that vertex mode. That will be difficult to work with all parts together. But here's the easy way to fix that. We're going to create new material.
We're going to link this material to all the parts, just, you know, assign this one material everywhere. And in the materials, we're going to need to do one thing. Right click and in inputs, going to find this attribute attributes. That attribute is basically a vertex color that we can connect color to base color. And now if we switch to viewport shading, enable material preview, we can see the color. Black is default vertex color.
If it's not assigned, we can also preview pure color. But I don't think that looks nice. We better preview it like this. This is more realistic. And now we can actually continue to do the painting. So, first of all, I assigned the biggest parts, adjusted the colors. But some parts actually are multicolor. So not a problem. I just going to go inside that part and use brush to paint that area. I also going to do that with the hands.
Same material. And here we go. That was pretty easy. And again, it also was that easy because I have all parts nicely separate. So this part separation is absolutely amazing approach. And now we can actually move to the printing part. I'm using resin printer again. It's Elego 16K. But again, like it has quite limited printing area. Well, I'm pretty satisfied with it. Also, I discovered that I really like ABS resin. First, it's increased resolution and it's more robust in some way, I would say.
And for my slicer software, there will be two two box. Actually, most of the printing and painting process will be done by my girlfriend. You're going to see all the footage because I'm too busy working on another video. So don't forget to like and subscribe. There will be more, more content. And there's actually already a lot of content on my channel on many topics related to 3D and AI specifically. And for 3D printing, there is a complete playlist already.
Altogether, all printing took me like few days because it's like a big, big model. And the resin printer like high resolution and like it just taking like a lot of time. But it was not that annoying. Like I was just printing at night. But one of the biggest part was printing like what, 10 hours. Well, that's just specifics of the printing. Other than that, we printed all of this. Then you cure it, polish it, do the base before you can paint it and the painting itself.
And one of the reasons why I split all that parts that nicely is the painting mostly, because technically, let's say this model will be smaller in size. The painting will be so much pain in the ass. Like these flowers, for example, you're going to need to do this. A scotch around then paint with that airbrush. You know, that's that's quite annoying. Like, well, if you just separate that part, you paint it like easily.
Like what you see on the screen, like the cave, for example. Paint the cave, won't just glue that, etc. Again, from my experience, there must be some small gap around middle, right? Because base and painting will add some layer and it will be easier to fit this part together. But all that's done and the model is finally ready. Look at this. It's just amazing. And here she is. Look at this beauty. This is definitely the biggest model I printed so far.
It's like almost 40 centimeters. Mr. Mark says this is a huge work. Really hope you enjoyed this video. Learn something new. You want more details? There's more videos on my channel. Like and subscribe and I see you in the next one.
The words are the caption track's own and nothing is reworded or re-transcribed. Paragraph breaks are placed between sentences so the text reads as prose.
Free tools for your own script: paste a draft and see where it stands before you record it.
Paste your draft and see where viewers are likely to drop off, with a rewrite for each weak line.
Paste the first 30 seconds of your own draft for a hook score and rewrites.
Check your draft against YouTube's advertiser-friendly guidelines before you record it.
Read this channel's public videos and transcripts, and download a writing brief for it.