Getting the transcript
Reading the captions from YouTube. A video nobody has opened here before takes 10 to 30 seconds; this page fills in on its own.
Getting the transcript
Reading the captions from YouTube. A video nobody has opened here before takes 10 to 30 seconds; this page fills in on its own.
Jake In Motion · @JakeInMotion
Where viewers went back to watch this video again, from YouTube's public Most replayed graph, lined up with what was said at that moment.
Most replayed moment #1
16:343.8x the video's typical replay level
to the material options at the bottom. Now, I've imported a bunch of materials called subsar, which is SPS substance materials that will now populate this material list. As long as they're in my After Effects project, they're going to
Said at 16:28
Most replayed moment #2
14:513.3x the video's typical replay level
can really see that harsh transition. Now like I said, I want a psych wall. I'm guessing that you might appreciate that too. So I created another free script exactly for this reason called psych wall. So let me open that up. Here it is. Another single button script. If you click it, it's going to generate a
Said at 14:44
Most replayed moment #3
2:002.4x the video's typical replay level
check out my website, jakenmotion.com, and take 20% off anything on the site for the rest of January. Another really great feature that's really simple and easy to understand is the ability to now crop to the bounds of a layer or multiple layers. So, if I grab, say, this heart and this shoe and I go up to
Said at 1:53
The graph counts replays. It does not show where viewers stopped watching.
Words
5,946
Runtime
28:34
Speaking pace
208wpm
Reading time
25min
208 words per minute, above the 201 75th percentile of 349 measured videos. That distribution comes from the 349-video hook study.
Opening (first 30 seconds)
After Effects version 26 is finally here and it's packed with new features for 3D text animation, brand new effects, expressions, and a whole lot more. In this video, I'm going to walk you through every single one of these updates and show you how to start using them in your projects today. Plus, I have a brand new script and 3D models that I'm giving away in this video. We've got a lot of ground to cover. So, let's start with some of the quicker updates. The first new feature is the ability to preserve gradients from Illustrator files when you convert them
104 words, the words spoken in the first 30 seconds at 208 words per minute.
Free, no signup. See how the first 30 seconds hold attention, with rewrites.
Sentence shape
| Measure | This transcript |
|---|---|
| Sentences | 386 |
| Average words per sentence | 15.4 |
| Longest sentence | 61 words |
| Questions asked | 0 |
| Sentences containing a number | 49 |
Most used terms
Filler phrases
43 in total: like 22 · actually 11 · kind of 5 · basically 2 · you know 2 · literally 1.
A literal whole-word count of the same phrase list the Prepublish browser extension uses, so a phrase inside another word is not counted and a phrase used in its ordinary sense still is. It is a count and not a judgement.
Free, no account. See where attention is likely to drop, with a rewrite for each weak line. The free check shows the scores and the one issue costing the most. Or run it on the words above first.
Free · No login · See a sample audit first if you prefer.
What this transcript is
Every word below is the caption track YouTube publishes for this video, pulled from the video itself and reproduced unchanged. It is not Prepublish's writing, not a summary, and not a re-transcription: it is the video's own published captions. English captions, generated automatically by YouTube, in the video’s original language. Source: the video on YouTube. A channel that would rather this page did not exist can ask for its removal through the contact page, and it is removed.
After Effects version 26 is finally here and it's packed with new features for 3D text animation, brand new effects, expressions, and a whole lot more. In this video, I'm going to walk you through every single one of these updates and show you how to start using them in your projects today. Plus, I have a brand new script and 3D models that I'm giving away in this video. We've got a lot of ground to cover. So, let's start with some of the quicker updates.
The first new feature is the ability to preserve gradients from Illustrator files when you convert them to shapes in After Effects. So, if I rightclick, say create shapes from vector layer, those gradients are going to be preserved, both linear and radial gradients for fills and strokes, we're still going to get some extra paths that I believe are for positioning with those gradients. But if I go into this group right here, which is the background, you can see the handles.
I'll just make this a different color so it's easier to see. There's the gradient handle for the start and the end. And you can see that this outer box, that's just an empty path. That's at the same angle. So, if I just grab this merge paths and path one and hit delete, it's going to look visually the same but be a little bit cleaner. I like my shape layers to be as clean as possible. So, you can do that to clean it up.
But, in addition to preserving those gradients, we have some extra controls in our gradient options now. So, there's the start and end point, which are those two handles I just adjusted. But, we also have the ability to scale and rotate that gradient. So, if I scale this down, you can see that it's doing just that outside of the bounds of the start and end points. And same thing for the rotation. I can now animate this without having to do any kind of expressions set up with the start and end points, which is going to have a real impact on my day-to-day workflow when it comes to working with gradients.
And like I said, this works for strokes as well. So, if I come over to this icon, rightclick, create shapes from vector layer, we're going to preserve that gradient along the stroke as well. And by the way, this is a sample project from my class, Animation Principles for Motion Designers. And right now, for the rest of this month, everything on my site is 20% off. So, if you're interested in becoming a better motion designer, go check out my website, jakenmotion.com, and take 20% off anything on the site for the rest of January.
Another really great feature that's really simple and easy to understand is the ability to now crop to the bounds of a layer or multiple layers. So, if I grab, say, this heart and this shoe and I go up to composition, you're now going to see crop comp to selected layers bounds. And when I do that, it's going to do exactly that. It looks at the bounds of the layers, no matter what the transformations are, and it crops the comp to those bounds exactly.
And I am super appreciative to have that as a feature natively within After Effects. Now, moving right along, the next new feature of After Effects is the ability to import SVGs natively. So, you can now search for a logo on Google images, head over to Wikipedia, find that SVG file, download it in its original quality, which is SVG. Drag it directly into After Effects, and it imports it not as an SVG, but as an outlined shape layer in a comp.
All of those vector paths are ready and accessible for me. I'm just going to increase the bounds of my comp so it's 1920 x 1080. And I'm going to scale all of these paths up so that it's a little more appropriate for the size of my comp. And there we go. Vectors right out of the SVG ready to go as a shape layer. Now, the contents are going to come in very messy just like Illustrator files do. And again, I like to organize my shape layers.
And that's why I created a free script called regrouper, which is right over here. It's a very simple script, a single button, but with this selected, I can just click the button. It's going to analyze all of the groups within that shape layer and consolidate all of those groups down to the fewest groups possible. So, we went from 17 individual groups to two and it renamed them red and yellow. So, this is all of my red paths.
These are all of my yellow paths. Sometimes you can get issues with holes not filling in properly. But all you have to do to fix that is go into the group that's giving you trouble. Add a merge paths operator and set the mode to exclude intersections. And there we go. All of our holes are back and everything is nice and organized in those two shaped groups. You can download regrouper for free down in the description.
The next new feature of After Effects is lossless compressed disc caching. And this is something that's probably going to go unnoticed by you, but what it's doing is compressing your previews in After Effects as they're being cached without any loss in quality so that they take up far less space in your disc cache. What this means is that you're going to be able to have much longer previews and many more of them before filling that disc cache.
And this is going to be enabled by default, but you can access it under the preferences menu. So go to edit, preferences, and then head to the disk section. And this is where you'll find that option, enable compressed frames. Now, while we're here, you'll notice that the preferences have actually gotten a refresh as well. There's no longer a general category. Things have been organized and structured within each category to make a little bit more sense.
And I actually appreciate this organization. I think it does make more sense. So that's another new feature of After Effects version 26. Next up is a very exciting new feature, variable fonts. If you're not aware, a variable font is a special font type that's essentially parametric where you can change certain properties created by the designer, like the weight of the font or the width of the font. Usually, you choose a font and then you choose what weight or what width or itallic versus regular.
That's all individual hard-coded versions of that font. Variable fonts allow you to change something like the width or the slant or whatever property the type designer added into the variable font using these slider controls for these individual axes. They're going to show up right here in the text panel. And what's amazing about this is that these properties are completely accessible by text animators. And what that means is that you can create something like this extremely quickly.
And I'm not going to get into how text animators work. If you want to learn, I have a video above that you can watch that goes into a lot of detail about how text animators work. But now that we have the ability to add in font axes into text animators and animate them exactly the same way as any other property, creating this kind of animation is now completely non-destructive where before it involved a whole lot of key frames.
I have a tutorial on that as well. For the actual paths of the outline text, it's not editable after the fact at all. It's a very destructive process. This is completely live. It's text that you can edit just like any other text layer. And it's animating between these variable width fonts. And Adobe Fonts has a lot of really great options for variable fonts. If you go to the browse all section, you can just check on variable fonts right here to see everything that's available and even preview those variable font properties right in the browser.
So, if I go into this one, I can see that there's a white property and I can adjust the slider for that right there. So browse Adobe fonts, check on that variable fonts filter, and find some fonts that you can start animating extremely flexibly. Anything you can do with the text animator can be used with these variable font properties. Next up is unmalt. And if you know, you know. If you don't know, there's a common workflow with compositing footage shot on a matted background.
In this case, flames on a black background. In order to get this to blend into the footage behind it, in this case a texture from texture labs of this blueprint paper, you can't just set the blend mode to say screen because that's going to not only remove the background but also blend all of this saturated color that we have from the flames into that background. And using keying effects like the color key or key light, they're just not going to cut it.
Even extract doesn't do a very good job of isolating the flames and preserving the fidelity of that color. Unmold, if I search for it, is now a native effect for After Effects. It is both 32-bit compatible and hardware accelerated, allows me to just apply it to my footage, and the background just magically goes away. It's set up to work with black by default, but we can also work with white as the matte color that it needs to key out as well.
And you can see that there's just no comparison to this and a blend mode. It preserves all of that rich color in the flames. It's extremely fast to render. And we have controls for adjusting the black level in case your background wasn't pure black and the softness if you want to play around with that. You can disable the color matting removal if you want, but honestly by default it just looks amazing. You can also clip HDR results if you need to.
I'm not working in HDR. I'm in 8 bits per channel, so that's not something I need. But let me show you another example other than flames. Here's some more footage of these ink droplets being pushed into water. It's got this really cool interaction going on. Again, shot on a black background. If I apply unmold, it's going to just remove that instantly. And I can play around with my black level to again dial that in however I need to.
Same thing for a white background. Here's another ink drop being shot into a white background. If I apply unmalt and I set this to white, it's going to remove that white. And obviously, blue on blue doesn't look that great. So, we could grab our hue and maybe rotate this around to be yellow or lime green. That is such a great effect to have natively in After Effects. Now, okay, now let's get on to some of the big updates. 3D has some fantastic new features in After Effects.
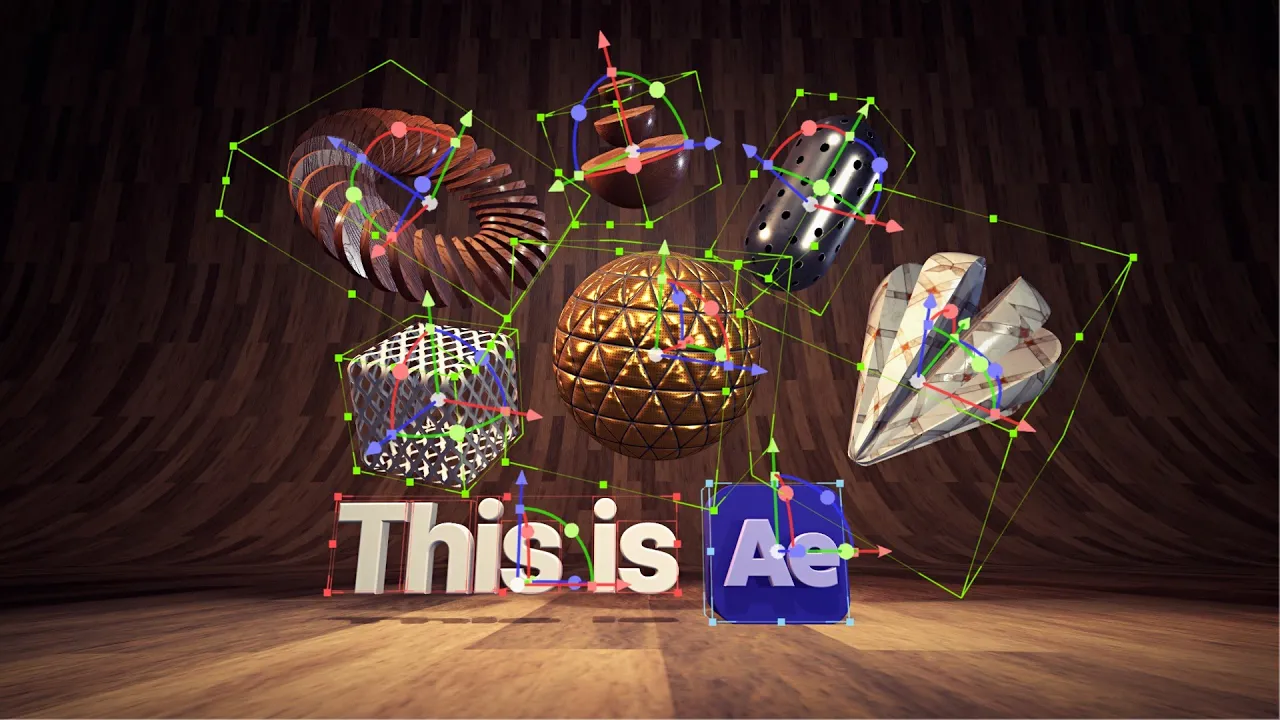
As you saw in the intro, After Effects now has parametric 3D meshes, and you can see them in full swing in this scene. All of these shapes and the text are 100% native After Effects layers. All of the lighting, even is done with After Effects lights. I'm not using an environment light or an HDRI. This is all lit 100% in After Effects. And I'm viewing this in Draft 3D mode, but it still looks amazing. It is a little bit crunchy, but that's fine.
I can work extremely quickly in Draft 3D. I can see my ground plane, and I can extend my view. It's lightning fast for what I'm seeing here. And it's a really accurate representation of what it looks like in full quality. If I turn that off, you see it took less than a second to render one frame. That's partially due to my renderer options. This is a very important feature that you should know about if you're working in advanced 3D.
Go to your renderer options and make sure your quality and smoothness are turned down low while you're working so you get quick previews. Never ever ever crank this up to the max. There's absolutely no reason to do that. Same thing for smoothness on the shadows. I hardly ever go above a value of six. Play with those two sliders until you get the minimum amount of grain that you need for a scene. But as you can see, there's hardly any showing up here.
It really works extremely well. And in Draft 3D, I can play this back fairly quickly thanks to the Advanced 3D render engine being GPU accelerated. So, let's jump into what actually goes into making parametric shapes inside of After Effects. I've got a blank comp over here, and let's just take a look at the toolbar. This is where your parametric 3D meshes are going to live, right next to shape layers, which makes sense.
These are essentially 3D versions of shape layers, but instead of using vector paths, it's actual 3D meshes. So, we can draw out a cube, and I can hold shift to make that a perfect square. And honestly, I could turn off draft 3D. This is going to render really quickly. We can draw out a sphere. We can bring out a plane. This is obviously very similar to a rectangle, but we'll see some of the options that it has. We can do a Taurus, which is like a donut shape.
And I'll rotate that so we can see it. And then we have a cone, which by the way will go in the direction that you pull. So you saw the first time it went down, second time it went up. It's not going to go left or right, but it will pay attention to up or down. And then finally, we have the cylinder. So let's take a look at all of these very quickly. They're all completely parametric, meaning you have these properties over here that are non-destructive, allowing you to create custom shapes and animate them non-destructively.
Not even Blender has these parametric shapes, which kills me. I really wish that Blender would get onto that parametric train. But there are mesh options, bevel options, and some other really cool things like slicing for a lot of these parametric shapes. You can increase the radius to give you that beveled rounding edge on some of these shapes. The cone especially is very versatile. If I increase the top radius, I can kind of get a teardrop shape.
I could open up the bottom radius a little bit, and now we're going to get a flat cap. Or I could round that off as well. I could turn the number of sides way down to create more of like a prism or even a pyramid depending on how I have it set up and turn my smoothing angle down. Or grab maybe the sphere and turn the sides way down and the smoothing angle down to get a low poly look. There are lots of great parameters to mess around with in all of these shapes.
So definitely explore what you have available here. The slicing especially brings out a lot of possibilities with this cone. If I were to grab that roundness on the bevel and I just reset it back down to zero and then I slice it a whole bunch, I can create some very interesting shapes. I'll turn my smoothing angle all the way down. I'll turn the sides up to maybe five. And now I've got almost like the feathers on an arrow.
So you can create some very interesting shapes using a combination of slicing and playing around with the other properties. So get in there, explore this. It's extremely powerful and so responsive in the After Effects UI. Now, the one object that I wish was in this parametric shape list that is not is a psych wall or a seamless backdrop. I could grab my plane and just make it really big. And then there we go. We've got a backdrop that's a flat wall, but I want to have a floor.
So, I could duplicate this, maybe rotate it back 90°, lower it, and there we've got a wall, but that's not seamless. That's very harsh. And this is probably a little hard to see when we don't have lights. So, let's just go ahead and go to this HDRI folder, which is full of free HDRIs from Adobe Stock. And I've included a link in the description for these as well. But every single one of these environments will allow you to light your scene using image maps that have high dynamic range information saved within them that will actually light and create shadows with your objects in the Advanced 3D render engine.
And as you can see with all these examples of the three different spheres of the matte, the shiny, and the plastic, they all create very drastically different looks. To set one up, why don't we just grab, say, this studio umbrella and soft boxes since that's kind of what I'm creating here. I'll just drop it into my comp. I'll add a new environment light. So, new light environment set to 100% and my shadow darkness I'll leave at 40.
Click okay. And then choose that HDR as my environment light. And now my scene is being lit much more realistically. Now this is all set up to be very low poly. But if I turn my sides back up and my smoothing angle back to 40. Now we're getting a much better looking sphere. And now if I grab that environment light and wrap this around, you can see that it is actually lighting my scene and we can really see that harsh transition.
Now like I said, I want a psych wall. I'm guessing that you might appreciate that too. So I created another free script exactly for this reason called psych wall. So let me open that up. Here it is. Another single button script. If you click it, it's going to generate a shape layer with some custom controls that creates a seamless backdrop. So let me rotate my lighting around just so we can see this more clearly. And I'll turn off those two planes.
This is the parametric cycle wall. So if I increase the width, it's going to make it wider. I can increase or decrease the height, the depth, and I can control the roundness. That will be a percentage of the height and the depth. So, at 100%, it's going to try to make it as large as possible, but I'm going to put it somewhere around here. And now I've got that seamless backdrop. I'll just make it a little wider. We even have this value for pinch.
If I switch to my left view, so let me just change to my left side view here. You can see the radius. As I increase that pinch, it's just going to essentially smooth that roundness out even more, which does have an effect on how that backdrop is being rendered. So, you'll see that difference here as you adjust that slider. We can also change the color if we want to tint that backdrop to something completely different, but I'm just going to leave it at that gray color.
And as you can see, those shadows are showing up on top of that psych wall. This also works really great with CodeRunner, which is another free script that I have available on my website and down in the description. So, if you don't want to dock this in your interface, you can just add it as a button and it'll do the exact same thing. The only downside to this is because it's a shape layer, we cannot assign a material to it, which is the next feature of After Effects that I want to talk about.
So, let's just put a pin in that for a second and I'll jump over to this sphere and scroll on down to the material options at the bottom. Now, I've imported a bunch of materials called subsar, which is SPS substance materials that will now populate this material list. As long as they're in my After Effects project, they're going to show up here. And if I assign one of those to this sphere, it's going to completely change the way that it looks.
So, I'm going to go to say aluminum insulator. And that's kind of like this NASA spacey material, and it completely changes the way that my sphere looks. If I grab my environment light and I rotate it around, you see that it's a very convincing material and updates with all of that lighting and shading. Substance 3D is extremely powerful. I haven't learned it myself yet, but what I've seen of it is just incredible. What a material is able to do to simple geometry to make it feel so much more realistic is so much fun and it looks great inside of the advanced 3D render engine.
What's really cool about Substars is that the designer is able to expose specific properties from the material. itself so that we can edit them here in After Effects. A lot like we can create mgurts that are then editable inside of Premiere. So if I wanted to make this silver instead of gold, I could just change the color and there we go. And there's lots of custom controls for this particular material. Every material is going to have different controls based on what the designer has exposed.
But it even supports opacity. So if I grab, say, this box and I go to the material list and choose this caning weave, it's going to actually create transparency within that object. and we can see through that object to whatever's behind it. This is just an extremely powerful material system that we have access to now inside of After Effects. And if you have a subscription to Substance 3D, you can create materials yourself.
And by the way, I got all of these materials for free. All you have to do to get them is go to the material section, click on this little drop-own menu, and say get Substance Community Assets. And that's going to open up this asset library completely free to download that has models and materials. So if you needed fabric leather, you can go to that category and browse these. You can grab some marble textures or wood.
And all of these are extremely highfidelity. Most of them have really sophisticated controls for customizing the materials. And they're all completely free for you to use. I believe there's over 1,300 assets here for you to download and use in any project. I love what the After Effects team has been doing with the advanced 3D render engine. There are definitely more 3D features on my wish list that I hope make it into the advanced 3D render engine, but they've just taken huge strides over the last few years with what this render engine is capable of.
Now, really quickly, one downside to the shape layered base wall is that I cannot assign a material to it. We're just locked into the basic material properties for shape layers. And that's exactly why I created three actual models of walls. one that's just like the psych wall primitive shape where it has a floor and a backdrop. And this will allow me to set a material. So, if I choose this aged pine wood flooring, there we go.
We've got that showing up there. I can move this down, probably scale it up quite a bit. And then I could scale the texture itself down. So, if I go into the material texture scale, I could repeat this a lot more. So, it's just a little more to scale of my scene. But I also have a psych wall corner object that's going to be just a floor and one wall. So you could get into the corner there or a full psych wall that has both walls on either side as well as the back.
And that way you can pan around your camera within that and not see the edges like we do out here. And by the way, this is still in full quality. And look at how responsive this is. I could turn Draft 3D on and it'll be even faster. Anyway, you can download those models for free down in the description as well. The next thing we need to talk about, I'm actually going to set this psych wall back to its default and let's add in some spotlights.
So, I'm going to get rid of the environment light. I'm going to go up to layer, new light, and add a spotlight. And we're going to leave it at the defaults for now. That'll take a second to load in the lighting, but once it's there, it's this is extremely responsive and easy to work with. Now, my entire scene went black because my defaults were actually messed up. I'm going to reset fall-off to none. And there we go.
Now we've got our spotlight showing up. Since there's nothing else in the scene, there's literally no light from anything else. This is a vacuum of space void. And this one spotlight is the only thing that is going to produce light. Now, I'm going to back this up a little bit so we can see more of our objects. And if I just go into the cone feather and increase that, we're going to get something that looks a lot more natural.
But prior to version 26, these shadows for spotlights were not possible. So now I can increase my cone angle, adjust that cone feather, and disable shadows if I don't want them to be cast. But again, that takes a little bit of time to calculate. Once it's done, it's very fast to update. I'm going to turn that back on. We can turn that darkness up or down. And we have the ability to diffuse the shadows. So if I were to zoom in here on this cylinder, you can see that near the contact point, the shadow is pretty sharp.
If I turn this all the way down, the entire shadow is sharp. But as I increase that, it gets softer and softer the further away it goes. And this might be easier to see if I move the cylinder over here a little bit. So there you can see the further away it goes, as that diffusion increases, it's going to get softer and softer. And note that that basket weave material opacity, even that is supported by these light rays and it's casting shadows through that material.
That is such a cool feature. You could even create some goos to create very realistic lighting using this technique and putting an object like that. It could be as simple as a plane with that texture applied in front of the light source. Now, if I turn Draft 3D off and I zoom in here real quick, I just want to point out that there is grain in my shadows. And that's where I would go into my renderer options and increase both the render quality and the smoothness just enough to have basically an acceptable amount of grain at 100% resolution.
So that's right here. That looks fantastic and it's still rendering very quickly. Otherwise, I'm going to leave that render setting down to a very low number. I'm going to set it back to 12 and two just so this renders more quickly as I'm working. Now, in addition to the spotlight supporting shadows, we also have the ability to cast shadows using parallel lights. So, I'm going to add another light parallel this time.
And the difference between a parallel light and a spotlight can be a little bit confusing. You can think of a parallel light like the sun. It's 93 million miles away from the Earth. By the time the light reaches Earth, the rays that are hitting us are essentially parallel. There's no fanning, no feathering, no cone angles. This is purely uniform light rays being cast on everything in the scene exactly the same. So that's why we don't have any of that feathering, that cone angle.
But we do have the ability now to cast shadows with parallel lights in the advanced 3D render engine. So the only thing that really matters here is the angle of this line between the position of the light and the point of interest. That is what controls the lighting anywhere in the scene. It doesn't matter what's in front of this light. It's always going to cast that parallel light uniformly across the entire scene. And as you saw in the intro, you can do a lot with just spotlights.
That's what I use for everything in this scene. I applied the same substance material to everything in this scene and altogether it creates something that I wouldn't have believed was After Effects 5 years ago. You make the argument that this is way behind other apps, but I'm not complaining. I'm focusing on what I have now, and this is going to make a huge difference in my After Effects workflow. No, it's not going to replace 3D modeling by any means.
But now that I can bring in my own custom geometry and create some very sophisticated primitives, my workflow is going to be so much faster and require me to leave After Effects much less often. All right, moving right along. We've got some more ground to cover. There are actually three new audio effects included with version 26 of After Effects. Audio editing is not something I tend to do inside of After Effects, but they are here for you if that's what you want to do.
And those three new effects are compressor, gate, and distortion. So, first of all, compressor is basically just leveling out the volume of your audio. So, bringing the louder parts of your audio down to match more of the quiet parts. And then that is usually followed up by increasing the overall volume so that you're essentially compressing the levels of your audio. The next audio effect is the distortion effect. And that does pretty much what you'd think it would.
As I put it on my own audio now, you can see that it's distorting the audio. Not something that I've ever thought, man, I wish I could distort some audio in After Effects, but we have that option now. And then finally, we have the gate effect, which is essentially going to create a threshold for a volume level to cut off. So, if the audio level is ever at a certain threshold, it's just going to essentially be muted. And this could be useful for background noise, but again, it's not something that I would do inside of After Effects typically.
Still, the audio category in After Effects is now filled with some pretty useful audio effects if that's what you want to do. We actually have some new expressions to work with in After Effects. Now, previous key and next key. So if I just bring up my position and I add a key frame here and then I go forward and move this layer up. So that's all this animation is. I can alter option click to add an expression and type out previous key and that will autofill.
And then between the parenthesis I have to put a time value. So this would be measured in seconds if I do a number. So if I just say one, this is saying find the previous keys value from the time of 1 second. So at 1 second, it's going to find the previous key for this property and give me that value. So if I apply this, that's exactly what we're going to see. I no longer have my animation. It's just looking at the key previous to the 1 second mark.
And if I drag my second key frame back before that 1 second mark, that's the key frame value we're going to return. Now, it's not a very useful scenario, but that's the basics of how this expression works. You can use this to measure specific keys now and link it into more complex expressions rigs. This also works for next key. So if I type in next key instead of previous, whoops, let me get rid of this. And again, I leave it at 1 second, then it's going to find whatever value is after the 1 second mark.
And if I move these forward past the 1 second mark, it snaps to that first key frame. Additionally, we also have the ability to now read the values of drop- down menu controls. So, not just the index value, but the actual text within it. So, if I go to my source text property and I add an expression and I use my expression pickhip to grab that menu, it's going to fill that in and give me the index value for whichever option I have selected.
But if I just modify this expression slightly and I say text at the end and apply the expression now it will give me the menu label itself which is actually a really big deal for Mgurt because drop-own menus are very useful in After Effects templates but we couldn't access these labels within the drop- down menu before with expressions. So you weren't able to take full advantage of them in your mgurts. Now we can and it's really easy to do.
Another thing you're going to notice is that if you're snapping rotation, so I'm just rotating this freely and I hold down shift and snapping is now going to be much more reliable. This was a little buggy before, now it's very precise. After Effects is also now supported by Windows ARM processors with a few limitations, but for the most part, you can now use it on more computer types. You can also install any language version of After Effects now to preview what the UI would look like in that language.
You just have to uninstall the version that you have currently installed and then reinstall it in that language. And finally, a lot of bug fixes have been fixed in version 26 of After Effects. Thank you so much to the After Effects team for all of your hard work bringing this incredibly packed feature list to version 26. Let me know down in the comments what your favorite new feature of After Effects is. Thank you so much for watching this video.
I hope you have a fantastic day and I'll see you in the next one.
The words are the caption track's own and nothing is reworded or re-transcribed. Paragraph breaks are placed between sentences so the text reads as prose.
Free tools for your own script: paste a draft and see where it stands before you record it.
Paste your draft and see where viewers are likely to drop off, with a rewrite for each weak line.
Paste the first 30 seconds of your own draft for a hook score and rewrites.
Check your draft against YouTube's advertiser-friendly guidelines before you record it.
Read this channel's public videos and transcripts, and download a writing brief for it.