Getting the transcript
Reading the captions from YouTube. A video nobody has opened here before takes 10 to 30 seconds; this page fills in on its own.
Getting the transcript
Reading the captions from YouTube. A video nobody has opened here before takes 10 to 30 seconds; this page fills in on its own.
AI Search · @theAIsearch
Where viewers went back to watch this video again, from YouTube's public Most replayed graph, lined up with what was said at that moment.
Most replayed moment #1
28:563.9x the video's typical replay level
want with it as long as you don't profit from this commercially. Now, if you do legally want to use this for commercial purposes, then you do need to contact their sales. So, that's one downside of using this model. But, if you're just creating images for gooning, I mean, personal use, then this doesn't really
Said at 28:48
Most replayed moment #2
11:383.6x the video's typical replay level
turns your AI agent into a full content engine end-to-end. Try it today using the link in the description below. First of all, you're going to see some missing models on this left side, which will proceed to install in a second. Plus, you'll also see some missing nodes like this Ideogram Prompt Builder. Now, to
Said at 11:30
Most replayed moment #3
28:213.1x the video's typical replay level
does take some time to get used to. It's definitely a lot more work than just typing in a text prompt, but it gives you a lot more control. And once you get the hang of it, this is actually a really powerful feature. In terms of aesthetics, prompt adherence, world understanding, this is definitely a lot
Said at 28:14
The graph counts replays. It does not show where viewers stopped watching.
Words
5,826
Runtime
29:50
Speaking pace
195wpm
Reading time
24min
195 words per minute, between the 181 median and the 201 75th percentile of 349 measured videos. That distribution comes from the 349-video hook study.
Opening (first 30 seconds)
This is now the best open-source image generator you can use. It's called Ideogram 4, and this has incredible quality and prompt adherence and world understanding. But, it works really differently from the other top models you may be familiar with. In fact, the funny thing is, I almost gave up on this the first time I tried it. But, I gave it a second chance, and after doing a few tweaks, after playing around with it a bit more, I found that it's incredibly powerful and extremely underrated. So, in this video, I'm going to go over
98 words, the words spoken in the first 30 seconds at 195 words per minute.
Free, no signup. See how the first 30 seconds hold attention, with rewrites.
Sentence shape
| Measure | This transcript |
|---|---|
| Sentences | 346 |
| Average words per sentence | 16.8 |
| Longest sentence | 59 words |
| Questions asked | 3 |
| Sentences containing a number | 21 |
Most used terms
Filler phrases
60 in total: like 40 · actually 10 · basically 4 · kind of 2 · you know 2 · I mean 1 · right? 1.
A literal whole-word count of the same phrase list the Prepublish browser extension uses, so a phrase inside another word is not counted and a phrase used in its ordinary sense still is. It is a count and not a judgement.
Free, no account. See where attention is likely to drop, with a rewrite for each weak line. The free check shows the scores and the one issue costing the most. Or run it on the words above first.
Free · No login · See a sample audit first if you prefer.
What this transcript is
Every word below is the caption track YouTube publishes for this video, pulled from the video itself and reproduced unchanged. It is not Prepublish's writing, not a summary, and not a re-transcription: it is the video's own published captions. English captions, generated automatically by YouTube, in the video’s original language. Source: the video on YouTube. A channel that would rather this page did not exist can ask for its removal through the contact page, and it is removed.
This is now the best open-source image generator you can use. It's called Ideogram 4, and this has incredible quality and prompt adherence and world understanding. But, it works really differently from the other top models you may be familiar with. In fact, the funny thing is, I almost gave up on this the first time I tried it. But, I gave it a second chance, and after doing a few tweaks, after playing around with it a bit more, I found that it's incredibly powerful and extremely underrated.
So, in this video, I'm going to go over all the incredible things you can do with it and how to use it properly. Plus, I'm going to show you how to install this on your computer so you can run it for free and unlimited times offline. Let's jump right in with all the amazing things it can do. First of all, this has so much knowledge jam-packed into it. For example, I can prompt it to generate all these video game characters like Mario, Link, Zelda, Donkey Kong, Pikachu, all the way to like Sephiroth and Chun-Li.
And as you can see, it's able to generate all these characters very well. Note that this is just text-to-image, but it just has an inherent understanding of what all these characters look like. Or here's another example where we can generate a group photo of all these characters. And indeed, most of them do look correct, including Stitch and Doctor Strange, even the Black Panther, although it did turn Mulan into a man.
It's also great at text rendering. So, here's one of my classic prompts, and as you can see, Ideogram was able to get all the text correct. In fact, it understands a ton of different typography and font styles. And you can precisely control all of this in your prompt. It's also great with prompt adherence. So, here's my classic prompt with a ballerina dancing in a sunlit studio with mirrored walls scattered with pointe shoes and sheet music.
A rabbit watches atop a grand piano. Outside, there's an elephant that balances on a circus ball, and Ideogram is able to generate this perfectly. Now, there's a trick on how to generate this, which we'll talk about in a second. Here are some additional examples where it just generates much better photos while also understanding all the elements in my prompt. Here are some additional tricky examples for your reference.
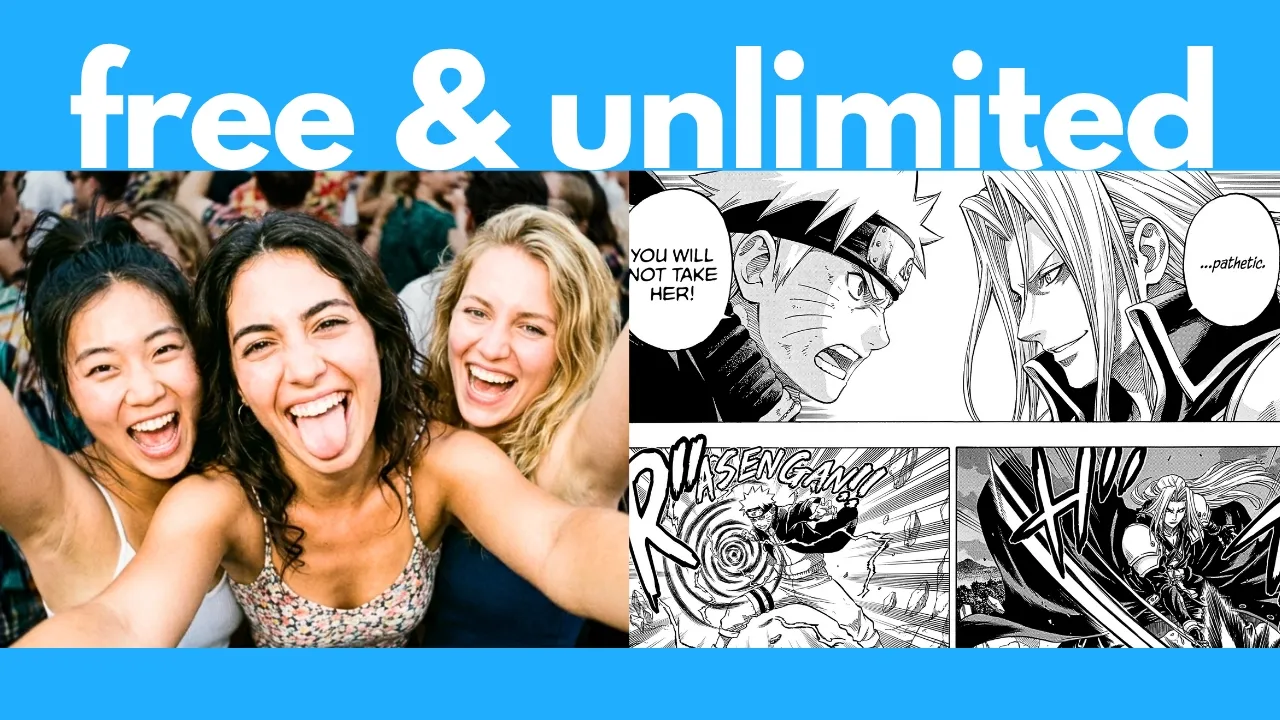
So, here we have a middle-aged artist using their hands to copy an image from a computer screen, but the whole thing is recursive. Or here's another example where we have a man looking into the mirror, but his reflection is a smeary data mash mess of colors and pixels while everything else remains clear and sharp. Ideogram is able to understand this very well. Or here's an example of generating Among Us. So, here I specified what should be in each panel of the manga page including the dialogue.
And as you can see, Ideogram is able to handle this very well. Notice that this is just text to image, but it's able to understand all these anime characters. Note that we're not really comparing apples to apples here because what I think is the coolest feature and what makes this different from all the previous image models like Z image or Ernie is that you can drag bounding boxes across the canvas to determine where everything is in the image.
I'll go over how to install this workflow later in the video so you can run it for free offline on your computer. But first, let me just show you a few cool examples. Let's say I want to create a poster for a music festival. Well, instead of just randomly pressing generate and hoping it turns out well, you can actually control how things are laid out on the poster. For example, we can set the title over here and then down here we can even determine the text and the look of this.
So, for example, let's set it to midsummer music fest and let's set this to cursive, bold, and grunge. And then we can even select the colors. So, let's set this to something like bright orange like this. Next, I'm going to set a tagline here and it's going to be folk funk forest and let's make this italics in smaller font. And then next, I'm going to drag a cat girl cosplayer playing electric guitar and it's going to be a mid shot of her.
Then afterwards, let me paste in some additional text here. It's going to be June 20th at this location and it's going to be a long strip with a black background, white text. And then let me add some additional text here. I'm also going to add a button down here. And then, for this one, let's set the color to dark red like this. And then, finally, I'm also going to drag another huge box behind everything. And this is going to be the background.
And let's set this to something like a silhouette of forest trees layered. All right. Afterwards, let's also set the art style to something like watercolor. And then, let's set this to kind of anime painting. And let's press run and see what we get. All right. So, here's our result. Notice that it follows everything that is specified in the layout, including, you know, the font and the text color, this anime girl, and the background of forest trees in watercolor style, plus all the text.
Next, here's another really cool example of how much control you can have for your image. So, for example, let's have a photo of a woman in the living room. For the style, let's set it to photo. I'm going to set this to realistic amateur casual. I'm going to get rid of all these settings. And then, again, let's draw where everything should be on the canvas. So, I'm going to draw a woman over here. And it's going to be a beautiful woman wearing a white bikini sitting on the sofa.
Now, here's where we can control this even further. For example, let me drag a box over here. And I can write her hand holding a can of Coke. And then, I can drag another box, let's say, over here. And then, have her hand doing a peace sign. Next, I can even drag another box here and have her right foot lifted up. And let's put this somewhere over here. And then, let's get her to sit on a sofa. So, I'm going to drag this huge box across here.
And then, let's write gray sofa. Actually, let's set this a bit higher and then over here. And then, since we have some room, let's also add a coffee table over here with some houseplants on the top. And then, I'm also going to drag a box over here and write a cat sleeps underneath the table. Now, there's some room over here. So, let's add a window with a man riding a T-Rex outside. Then finally, there's also some room over here, so let me add a final element, and let's add a poster of a Naruto movie on the wall.
Let's press run and see what that gives us. All right, here's our result. How awesome is that? As you can see, this matches what I specified in the canvas perfectly. This is not censored at all. In fact, what I can do is overlay that image back onto the canvas, so you can see all these different elements. So indeed, we have a Naruto poster, we have a woman wearing a bikini with her hand holding Coke here, her hand doing a peace sign here, her right foot lifted over here, plus a gray sofa, coffee table with a cat sleeping underneath it, plus a dude riding a T-Rex outside.
This gives you phenomenal control. Or here's another example. Let's say you want to create a manga from this. Well, I just need to change all these settings to a black and white manga page, and let's set this to be a high tension confrontation between two characters. I set the composition of each panel, so the first panel should be a wide dramatic bird's-eye view of a rain-drenched rooftop at night with the two figures standing a few paces apart.
And then I also added some onomatopoeia sound effects like this, plus a speech bubble over here. And then for the second panel, I told it to focus on one character called Kenji from the waist up, and then it should show a speech bubble with him saying this. And then for the third panel, it's going to be a sharp close-up of the other character's face, and he's going to have this speech bubble. And then finally, at the bottom it's going to be a close-up of these two characters clashing blades intense fight, and it's going to have this ching SFX.
So let's press run and see what that gives us. All right, here's what we get. So indeed, it follows everything I specified correctly, including the sound effects, plus the speech bubbles. This is really good. And again, if I just overlay the background on top of this, then everything matches where I placed my bounding boxes. So, those are just a few really cool examples of what you can do with this. As you can see, this is very different from other image models.
With this canvas and bounding box feature, this gives you ultimate control over how you want things to be in the image, including micro features like hands and feet, faces, and poses. And the quality and prompt adherence of this is just absolutely wild. After playing around with this for a bit, I can confidently say the quality is better than Flux Klein or Z image. All right, next let's go over how to install this. So, we are going to use this platform called ComfyUI to run Ideogram.
If you're not familiar with ComfyUI, this is the most popular platform for running open-source image and video generators offline. In fact, if you're not familiar with ComfyUI, definitely see this video first where I do a full installation tutorial of it. The nice thing about ComfyUI and why we use it is because it has automatic CPU offloading. So, even if you don't VRAM on your GPU to load all the models, this can just automatically offload it to any existing RAM you might have.
So, this allows you to run much larger models than would normally fit. So, even though Ideogram is quite large at 9 GB in size per model, people were able to successfully run this with as low as just 6 GB of VRAM. So, this is very accessible. Now, there are many different ways you can run Ideogram on ComfyUI. One way is if you click on templates and you search for Ideogram, you should see this V4 text-to-image workflow.
So, if you click on it, it looks like this. Now, you could run it through this way, but it's very error-prone. You'll need to format the prompt in this JSON format like this, and if you make any subtle mistake, it's going to mess up your generation. So, instead, I'm going to show you this workflow instead, which I highly recommend over the original workflow. Here, it includes this KJ Prompt Builder node, which allows you to drag these bounding boxes across your canvas, which gives you a lot more control and you don't have to work with such awful JSON code.
So, I'm going to link to this workflow file in the description below. Simply click on file and then click download, and you can save this wherever you want. I'm just going to save it in my root ComfyUI folder. Afterwards, simply drag and drop your workflow onto your interface and you should see something like this. If you want to turn your AI agent into a full-on creative production machine, definitely check out Higgsfield, the sponsor of this video.
They just launched Higgsfield MCP. Think of this as like the missing link between AI agents and actual media creation. With this, your agent, like Claude or Open Claw, can now generate, edit, and ship real creative assets like videos, images, and ads directly from one prompt. So, instead of asking Claude to plan a campaign, then manually jumping to a separate video tool, image tool, and website builder, Higgsfield MCP lets Claude, Open Claw, or Hermes agent run the whole pipeline end-to-end.
For example, you can describe a product and your agent can research the audience, write the marketing angles, and then use Higgsfield to create images or videos using the best models out there, including GPT Image 2 and Seed Dance 2.0. One prompt sets the entire system in motion. And for anyone running faceless channels or short-form content, this is where things get really interesting. Your agent can monitor what's trending, map those formats to your niche, and then use Higgsfield MCP to generate production-ready videos at scale.
Setup is also super simple. For Claude, you just go to settings and then connectors, and then paste in this Higgsfield custom connector. For Open Claw or Hermes, you just point your agent config to the same endpoint. One connector and suddenly your agent has access to an entire creative production stack. So, whether you're making ads, faceless videos, product launches, influencer content, or marketing campaigns, Higgsfield MCP basically turns your AI agent into a full content engine end-to-end.
Try it today using the link in the description below. First of all, you're going to see some missing models on this left side, which will proceed to install in a second. Plus, you'll also see some missing nodes like this Ideogram Prompt Builder. Now, to install these missing nodes, you need to install this ComfyUI Manager, which will help you detect and install missing nodes. Now, in case you don't have this ComfyUI Manager installed, here's a refresher on how you can install the latest version.
So, I'll link to this page in the description below. Notice that I'm using the Windows portable version, which is the recommended version. So, within my root folder, what I need to do is click at the top and then type in CMD to open this folder up in command prompt. And then afterwards, I just need to paste in this line. So, let me copy this and paste it in here. So, this is going to proceed to install ComfyUI Manager, as you can see here.
And then afterwards, we also need to paste in this tag to actually enable the manager when we launch ComfyUI. So, back to my run.bat file, let me just open this in any text editor like Notepad. And then in this line here, we're going to make sure that you have --enable-manager so that it'll actually load up ComfyUI Manager when you start it. So, afterwards, let's press Ctrl S to save this and then let's run ComfyUI again.
After you start up ComfyUI, you should see this button over here, which is the manager. Let's click on this. And then on this left sidebar down here in missing nodes, if you click on this, you should see several missing nodes, which you need to install. So, let's click install for all of these. All right, and then afterwards, it should say to apply these changes, please restart ComfyUI. So, let's press apply changes and wait for this to restart.
Now, after restarting and installing those missing nodes, you should see that most of the nodes are now available. But, if you still see that this prompt builder KJ node is missing, then you'll need to manually install this node. And, here's how to do so. So, I'll link to this GitHub repo in the description below. Here, it contains the installation instructions. So, first of all, you do need to use Git to clone this repo into your custom nodes folder.
So, what I'm going to do is click into ComfyUI, and then custom nodes, and then afterwards, at the top, I'm going to type CMD to open this up in command prompt. And here, I just need to get clone this repository. So, I can click on this green button, and then click copy here, and then paste the link back in here. So, now it'll proceed to clone this repo into my custom nodes folder. Afterwards, you should see this message, which means it has successfully cloned this repo.
And by the way, if you've already installed this KJ nodes previously, then to update it, what you need to do is double-click into your KJ nodes folder, and then at the top here, type in CMD. Make sure you're within this KJ nodes folder. And then to update it, simply type get pull, and it should update to the latest version. Afterwards, let's exit out of this, and let me restart ComfyUI from scratch. All right, after restarting ComfyUI, you should see the missing error from this KJ node go away.
And to make sure you do have this KJ node, you should see a canvas like this at the bottom, where you can drag and drop different bounding boxes. So, the next step is we need to install all these missing models. So, I'm going to link to this page in the description below. Simply click on files and versions, and then in diffusion models. Note that there are two different models that you need to download. You need to download one of the main Ideogram four models, and then you also need to download one of the unconditional models.
Now, for each of these, they have an FP8 version, or if If GPU supports it, you can also go for a more compressed NVFP4 version. Note that you do need to have both the main model and the unconditional model for this to work. For me, I'm going to go with the FP8 version. So, I'm going to click on this first one. Over here, I'm going to click download, and this goes in ComfyUI, in models, and then in diffusion models. Let's click save.
Note that this is 9.28 GB in size, but again, because ComfyUI is really good at offloading stuff, as long as you have enough RAM, not VRAM, you could potentially run the entire workflow with as low as just 6 GB of VRAM. Now, after downloading that, I'm also going to download this unconditional one, so let's click on this, and this also goes in ComfyUI, in models, and then diffusion models. Let's click save. All right, afterwards, back to our workflow, simply press the key R to refresh your model list, and then at the drop-down for the first one, let's select this unconditional model, which I just downloaded, and then for the second one, let's select the main model, which I just downloaded, and you should see the red outlines go away.
All right, afterwards, we need to download this clip text encoder called Quin 3 VLHB. So, again, going back to this page, which I'll link to in the description below, click on files and versions, and then in text encoders. And again, there's going to be an FP8 version, which is 10.6 GB in size, or a more compressed NVFP4 version, which is 6.3. So, depending on which GPU you have, you can download either one of these.
I'm going to choose this FP8 one, so let's press download, and this goes in ComfyUI, in models, and then in text encoders. Let's click save. All right, afterwards, press R to refresh your model list again, and then in this drop-down, I'm going to select this Quin 3 VLHB, which I just downloaded. And then, the final model that we need to load is the Flux 2 VAE. So, again, going back to this page, in files and versions in VAE, you just need to download this flux to VAE, which is 336 megabytes in size.
Let's press download and this goes in comfy UI in models and then in VAE. Afterwards, let's press R to refresh the model list again and then in this drop down, we can select this flux to VAE. So finally, after doing all those steps, you should have no more errors. We have all the models plus all the nodes required to run this. We can now proceed to start generating images. So let's go over this workflow. Let's start here.
So this node is where you set the aspect ratio as well as how large you want the image to be. So here's where you would select the megapixels and then Ideogram is able to support all these different aspect ratios including super vertical like 9 to 32 and super wide 32 to 9. So this makes it incredibly versatile. So for me, let's just go with 3 to 4 and then next, we will move on to this node, Ideogram prompt builder to type in what we want the image to be.
So for example, let's try something like two women in bikinis riding an ostrich in the desert. And then here's where we can also specify the background. So we can put something like desert and then sunset. And then for style, we can choose either none or photo or art style. And then we can also specify additional parameters for all these different categories. So for example, for photo, we can specify things like macro or Polaroid, drone or aerial photo, street photography, portrait photography, vintage photography, etc.
And then for aesthetics, we can specify stuff like minimalist, cyberpunk, cinematic, dark, etc. It's also okay to just leave these blank. And then for lighting, well, this can be like warm or cool, sunrise, sunset, harsh flash, golden hour, etc. And then for medium, it can be parameters like oil painting, canvas, realistic photo, watercolor, collage, poster, etc. Now, if I click run right away, it's going to proceed to generate the image based on what I input over here, but what you're going to see in a second is that for most of the time it's not actually going to generate anything, but instead it's going to give me this, image blocked by safety filter.
So, this is actually an image that was generated by Ideogram. So, that's pretty lame and that's why I initially gave up on this. However, this model is actually not censored. What you have to do instead of just inputting prompts here is you also need to draw bounding boxes over here to determine where each object should be in the image. So, let's draw these out really quickly. I'm going to drag a box over here and let me type something like a young beautiful blonde woman wearing a red bikini.
So, let's place her over here and then let's add another woman. This time it's going to be, let's say, a beautiful woman with pink hair wearing a black bikini. And then afterwards we also need to place the ostrich somewhere, so let's place it over here and let's write an ostrich running. And that's pretty much it. Now, we can add more elements here if we want, but let's just keep it simple and add these three elements which correspond to what we have in our prompt over here.
So, now if I press run again, it should now be able to generate the image. So, it has nothing to do with any safety filter, it's just because for our first iteration we haven't drawn any bounding boxes on this canvas. This is what you need to get used to is drawing these bounding boxes to generate the image. But once you get the hang of it, I assure you Ideogram is a super powerful image generator that can do a ton of stuff, including pretty spicy stuff like melons.
So, here's our image. As you can see, we have these two women riding an ostrich in the desert at sunset. So, again, it's super important that you draw these bounding boxes on this canvas before you start generating the image. Now, there's more settings here that you need to be aware of. First of all, let's say you have a ton of overlapping elements and let's say if you click on this, it's first selecting this ostrich element.
What if you want to select the elements at the back? Well, to do that, simply hold Alt and then click again and it should allow you to click on the underlying element. And if we want to click this one here, again just hold Alt and then click again and it should be able to allow you to select this one at the back. Another thing you can do is click on grab background, which would basically take this image and set it as the background.
And then here's where we can adjust the opacity of this image. Now, this doesn't mean it's going to take this generation as an input reference, all right? Ideogram currently is only text to image, but this is a helpful feature if you don't like the current arrangement of these objects in the photo and you want to rearrange them somewhere else. So, you can look at your output photo as a reference and then reposition your objects somewhere else.
Let's press clear all and also clear background and let me show you another example and this time instead of a photo, let's create a poster for some matcha drinks. So, for the high-level description, let's put a poster called matcha mayhem introducing three new matcha drinks. For the style, I'm going to put none. For aesthetics, let's put minimalist. For lighting, let's put smooth professional product photo. For medium, I'm going to put poster.
And then for the background, let's put something like minimalist cafe setting. Next, let's proceed to draw this out. First, let's draw the title. So, at the bottom here, I'm going to select text instead of object. It's going to be matcha mayhem. And then for the description, this is usually where I paste in, you know, the font or typography of the text as well as the color. So, for here, I want it to be large, bold, blocky sans-serif text in deep green color.
In fact, I can even select the color over here. So, for example, let's select a dark green like this. All right, next let's also add a subheading and then down here again, I'm going to select text and here the text is going to be this and the font should be this. Next, let me add three drinks. So, I'm going to add the first glass of matcha over here. Let's just set this to a glass of matcha with milk at the bottom. Now, what I can do is just click on this element and then press Ctrl D to duplicate it.
So, I'm going to drag this over to the left and then over here instead of milk, let's put purple ube milk at the bottom and then again, I'm going to click on this and then press Ctrl D to duplicate it again and then let's put it over here. This time instead of purple ube milk, let's put pink strawberry milk. And then what I'm going to do is actually at the top here, I'm going to add a Starbucks logo. So, let me double click on it and then type Starbucks logo.
Also down here, let me add labels for each one of these. So, here let's set this to text and then I'm going to write ube matcha and this is also going to be large bold blocky sans serif text in a deep green color. So, let me set this over here and then I'm going to press Ctrl D to duplicate it and then I'm going to set the label for this one. This one is just going to be matcha latte and then let me duplicate it again to add the label over here.
This time let's set it to strawberry matcha. All right, that's about it. Now, next let's press run and then I'll talk about some other settings and how to edit this further in a second. Now, note that this is quite slow compared to Z image and flux client which at least for me, I can generate an image in like less than 10 seconds. For Ideogram V4, it does take roughly a minute to generate one image. But the quality of this and the prompt adherence as well as the control of the composition of everything is just a a better than Z image or flex client.
Although, this bounding box feature does take some time to get used to. All right, here's our result. Now, if we don't like the position of certain things, we can actually kind of edit this further. So, that's what this node down here is for. Note that this image with all these bounding boxes and with all these settings basically has a seed or a unique ID of this number. If you use a different number, even if you keep the same settings over here, it's going to generate a slightly different image.
Now, by default, this seed number is fixed. So, if we press run again without changing the settings, it's going to generate the exact same image. Now, the reason why we want to keep the seed fixed in this case is if we want to keep roughly the same style, but just edit or reposition certain stuff. So, let's say I want to make the text here smaller. Well, what I can do is over here, let's press grab background to temporarily set the canvas background using our generated image.
Now, this doesn't mean that it's going to use this background as a reference input. Ideogram currently is purely text-to-image. So, you can't input any image for it to use as a reference. However, what this feature allows you to do is basically reposition certain elements, but still generate roughly the same image because down here we are using the same seed. So, for example, let's say I want to make this text smaller.
Again, if I click just on this, I might not be able to select this text element which is hidden at the back. So, what I need to do is hold down alt and then click on this again to select the text element. And this time, let's like shrink this down here, and then let me also shrink these ones to make them smaller, and also this one. And that's pretty much it. If I press run again, it should generate a very similar image, but just with the text repositioned.
All right, and here's our results. Notice that it's not exactly like the previous image because this is just text to image. It doesn't take the previous image as a reference. Now, if you want to keep the exact same settings, but generate a slightly different image, then that is where you can change the seed. So, what I like to do is just click on new fixed random to randomly shuffle this to a new seed, and then press run again, and it should generate a slightly different image.
All right, so here's a slightly different variation. So, those are all the basic settings. So, just to recap, you can set the aspect ratio and the size of your image over here. Here's where you can fill in a ton of different settings like high-level description, as well as the background, as well as these different settings. And then for here, you can drag any elements onto here, and then press Ctrl D to duplicate elements.
You can also click on each element, and then set some reference colors over here. And to delete a color, simply right-click on it. And if you want to generate a slightly different image while keeping all these settings the same, then down here, simply click on new fixed random or click on randomize each time to set the seed to a random value every time. And then there's one more setting I forgot to mention, which is the batch size.
So, this is how many images you want to generate at once. Right now, it's just set to one image, but you can set this to like two or four if you want to generate four images at once. So, that sums up how you can use Ideogram V4 in ComfyUI. This bounding box setting does take some time to get used to. It's definitely a lot more work than just typing in a text prompt, but it gives you a lot more control. And once you get the hang of it, this is actually a really powerful feature.
In terms of aesthetics, prompt adherence, world understanding, this is definitely a lot more powerful than Z image or Flex Kline or even Quinn image. I'd have to say this is the best open-source model you can use right now. So, definitely give it a try. Now, final thing I want to mention, and what some of you might be concerned about, is that Ideogram 4 does have a non-commercial license. So, you can run this offline and do whatever you want with it as long as you don't profit from this commercially.
Now, if you do legally want to use this for commercial purposes, then you do need to contact their sales. So, that's one downside of using this model. But, if you're just creating images for gooning, I mean, personal use, then this doesn't really matter to you. Anyway, that sums up my tutorial on Ideogram V4. If you run into any errors during the installation, welcome to copy and paste the exact error message in the description below and I'll try to help you troubleshoot as much as possible.
As always, I will be on the lookout for the top AI news and tools to share with you. So, if you enjoyed this video, remember to like, share, subscribe, and stay tuned for more content. Also, there's just so much happening in the world of AI every week. I can't possibly cover everything on my YouTube channel. So, to really stay up to date with all that's going on in AI, be sure to subscribe to my free weekly newsletter.
The link to that will be in the description below. Thanks for watching, and I'll see you in the next one.
The words are the caption track's own and nothing is reworded or re-transcribed. Paragraph breaks are placed between sentences so the text reads as prose.
Free tools for your own script: paste a draft and see where it stands before you record it.
Paste your draft and see where viewers are likely to drop off, with a rewrite for each weak line.
Paste the first 30 seconds of your own draft for a hook score and rewrites.
Check your draft against YouTube's advertiser-friendly guidelines before you record it.
Read this channel's public videos and transcripts, and download a writing brief for it.